Aloe MVTS Pro
xDR files
Please use Files Collector "Aloe MVTS Pro v>=1.8.1-40f" for MVTS Pro v.1.8.1-40f (or newer).
Make sure that /var/cdrs/ directory is created with 02775 permissions on the MVTS Pro server, or create it by using command:
mkdir -p /var/cdrs
chmod 02775 /var/cdrs
Go to the "xDRs → Export xDRs → Scheduled Export" section and set all parameters according to screenshot:
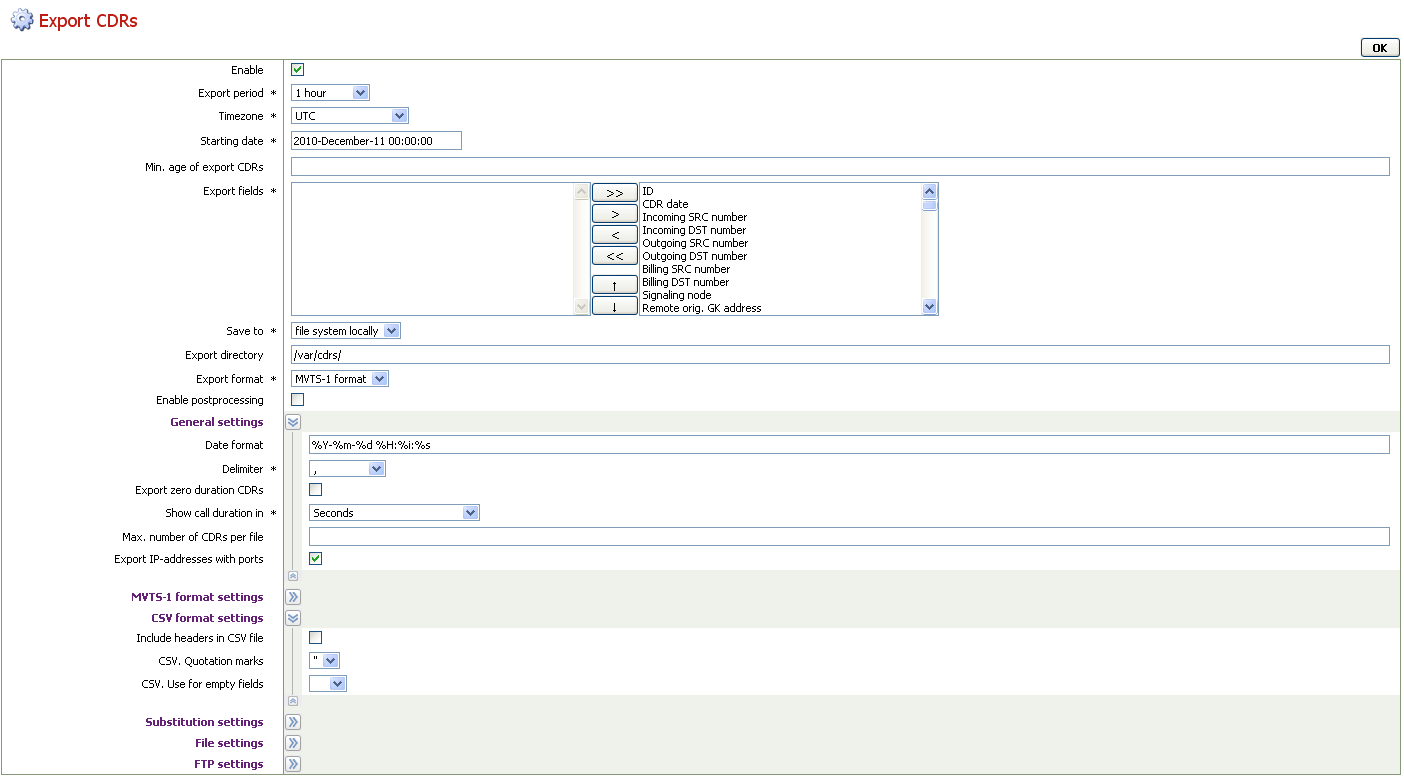
Please pay attention to the following fields:
| Field | Description |
|---|---|
| Export Period | Set desirable xDR creation period |
| Timezone | Set this value to UTC |
| Export Fields | Select all available fields (should be on the right) |
| Save to | Select "file system locally" and set directory to /var/cdrs/ |
| Export Format | Select "MVTS 1 format" |
| Delimiter | Set to , (comma) delimiter |
| Show Call Duration in | Set to "Seconds" (without any rounding options) |
When configuring xDR-files collector in the JeraSoft Billing, you need to set Overwrite TZ option to the actual timezone of your choice (for example, UTC) to prevent differences in the call times since MVTS Pro does not write timezone to the CDR files.
RADIUS
Please note that described integration includes RADIUS authentication, authorization, accounting, and external routing features. You may enable only the parts applicable to your case if you do not want to utilize full functionality.
Please note that the current documentation is relevant to the MVTS Pro v.1.8.1-40f.
Adding RADIUS server
Go to "RADIUS configuration > RADIUS Servers" and add the RADIUS server with the same parameters as on the screenshot below:
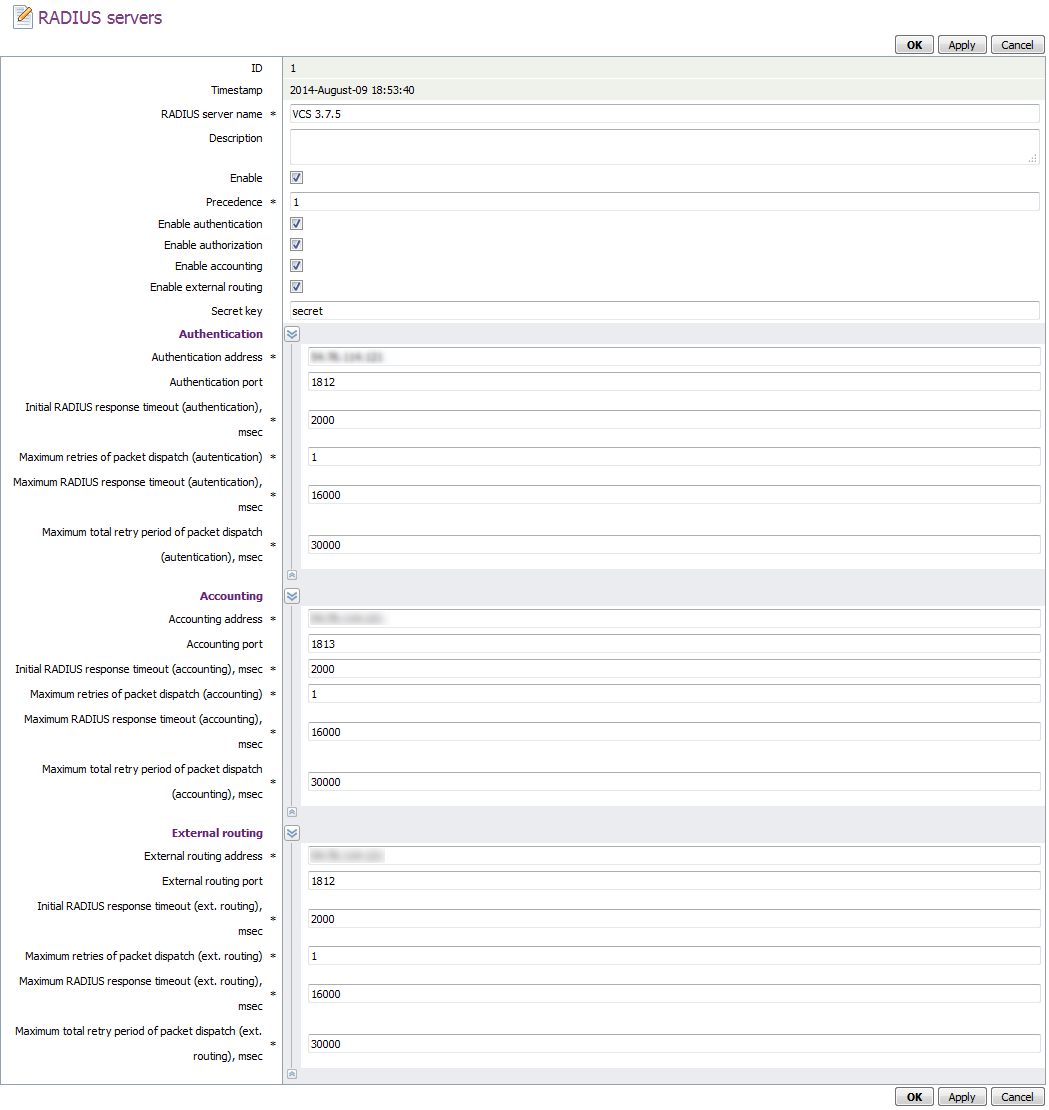
Pay attention to the following fields:
| Field | Description |
|---|---|
| RADIUS Server Name | Set to "JeraSoft RADIUS" |
| Enable | Activate the checkbox |
| Precedence | Set to `1`` |
| Enable Authentication | Enable if you need RADIUS authentication |
| Enable Authorization | Enable if you need RADIUS authorization |
| Enable Accounting | Enable if you need RADIUS accounting |
| Enable External Routing | Enable if you need Dynamic Routing |
| Secret Key | Set to a random value (same as in the JeraSoft Billing) |
| AUTHENTICATION | |
| Authentication Address | Set to the IP of the JeraSoft Billing |
| Authentication Port | Set to 1812 |
| Initial RADIUS Response Timeout (Authentication) | Set to 2000 |
| Maximum Retries of Packet Dispatch (Authentication) | Set to 1 |
| Maximum RADIUS Response Timeout (Authentication) | Set to 16000 |
| Maximum Total Retry Period of Packet Dispatch (Authentication) | Set to 30000 |
| ACCOUNTING | |
| Accounting Address | Set to the IP of the JeraSoft Billing |
| Accounting Port | Set to 1813 |
| Initial RADIUS Response Timeout (Accounting) | Set to 2000 |
| Maximum Retries of Packet Dispatch (Accounting) | Set to 1 |
| Maximum RADIUS Response Timeout (Accounting) | Set to 16000 |
| Maximum Total Retry Period of Packet Dispatch (Accounting) | Set to 30000 |
| EXTERNAL ROUTING | |
| External Routing Address | Set to the IP of the JeraSoft Billing |
| Routing Port | Set to 1812 |
| Initial RADIUS Response Timeout (Ext. Routing) | Set to 2000 |
| Maximum Retries of Packet Dispatch (Ext. Routing) | Set to 1 |
| Maximum RADIUS Response Timeout (Ext. Routing) | Set to 16000 |
| Maximum Total Retry Period of Packet Dispatch (Ext. Routing) | Set to 30000 |
Please also check the following:
- In "RADIUS configuration → RADIUS accounting profiles" – standard profile must have "of both legs" parameter specified for the "Send ACCT.START/STOP" packets field.
- In "RADIUS configuration → RADIUS global settings" – Active RADIUS accounting profile parameter is set to 1.
Performing default authentication
MVTS Pro can use RADIUS to perform "default authentication", whereas use account will be authenticated through RADIUS by settings in the JeraSoft Billing, not by adding respective customer account in the MVTS Pro interface.
If you would like to active this behavior, go to "Equipment → Equipment" and create DEFAULT gateway.
Default gateway configuration should look like on the provided screenshot:
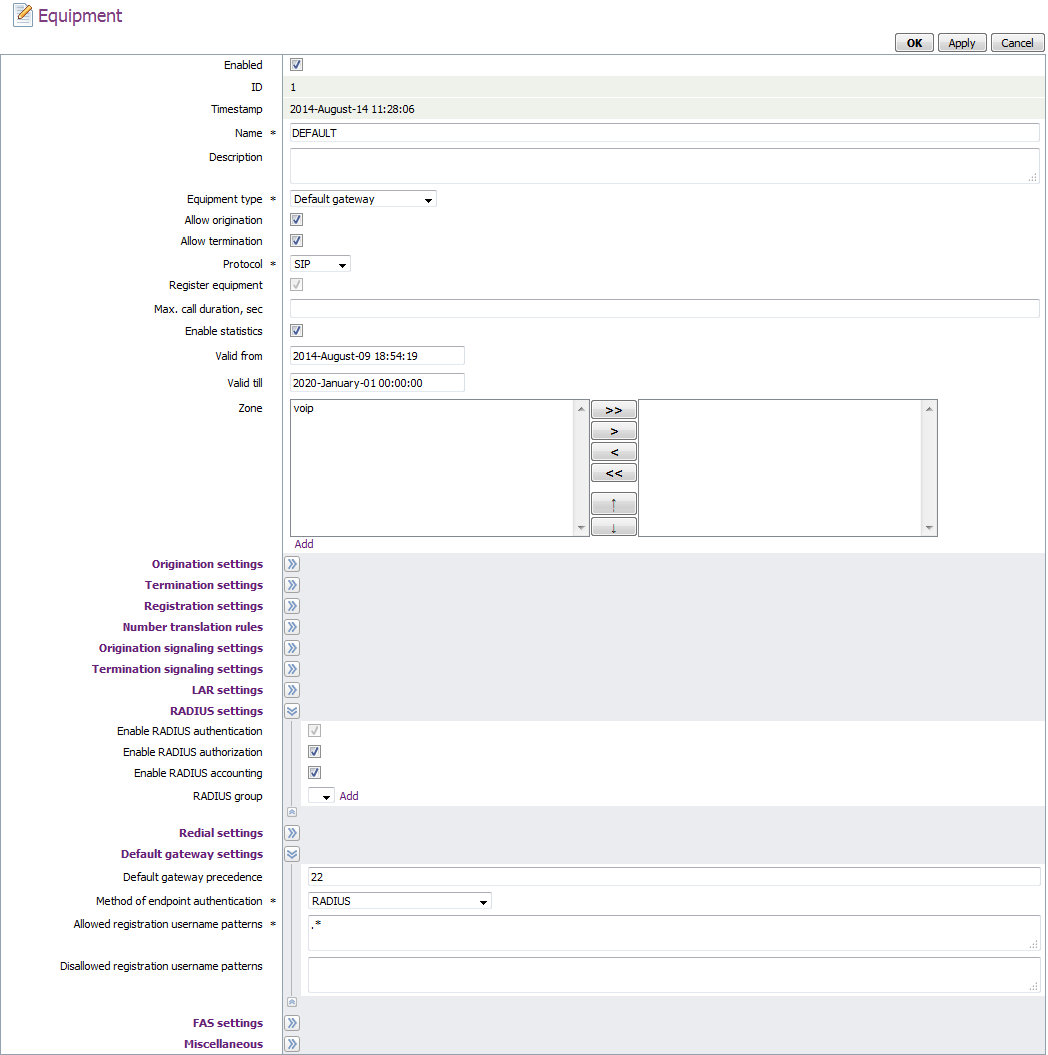
Please pay attention to the following fields:
| Field | Description |
|---|---|
| Equipment Type | Select "Default gateway" |
| Protocol | Select "SIP" |
| Enable Statistics | Enable the checkbox |
| Enable RADIUS Authorization | Enable the checkbox |
| Enable RADIUS Accounting | Enable the checkbox |
| Method of Endpoint Authentication | Select "RADIUS" |
| Allowed Registration Username Patterns | Set to .* |
External routing
Please note that the current documentation is relevant to the MVTS Pro v.1.8.1-40f.
If you would like to use external routing for MVTS Pro, make sure that you have completed RADIUS integration, described above.
Adding JeraSoft equipment
Go to "Equipment → Equipment" and create the following gateways: BILLBERY_SIP, BILLBERY_GW, BILLBERY_ROUTING. Please make sure that each gateway parameters match values, provided on respective screenshots below.
BILLBERY_SIP
This gateway is used for SIP traffic and its settings will be used for all SIP-based routes. The gateway configuration should look like the provided screenshot:
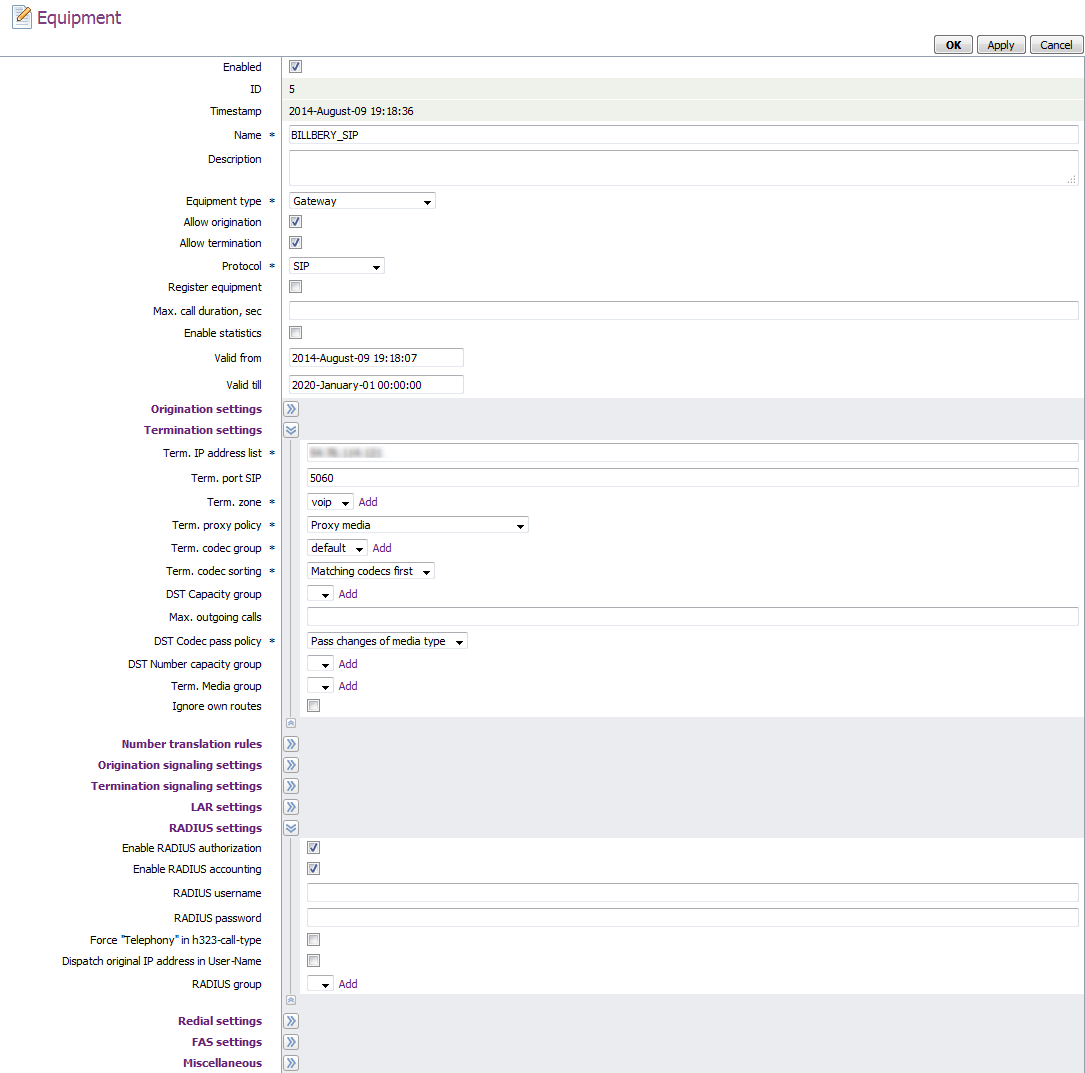
Please pay attention to the following fields:
| Field | Description |
|---|---|
| Equipment Type | Select "Gateway" |
| Protocol | Select "SIP" |
| Orig. IP Address | Set to 0.0.0.0/0 |
| Term. IP Address | Set to the IP of the JeraSoft Billing |
| Term. Port SIP | Set to 5060 |
| Enable RADIUS Authorization | Enable the checkbox |
| Enable RADIUS Accounting | Enable the checkbox |
BILLBERY_GW
This gateway is used for H.323 traffic and its settings will be used for all H.323-based routes. The gateway configuration should look like the provided screenshot:
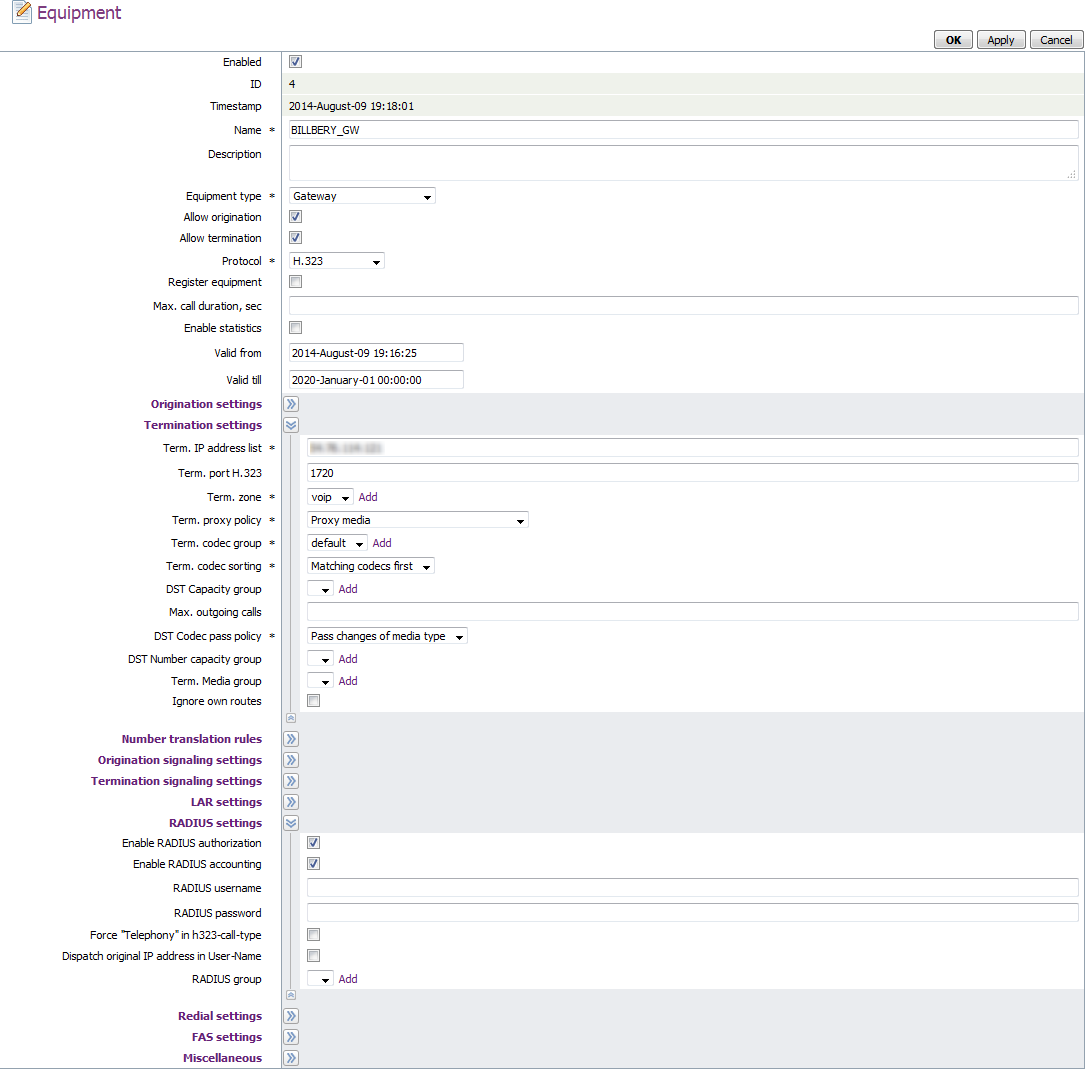
Please pay attention to the following fields:
| Field | Description |
|---|---|
| Equipment Type | Select "Gateway" |
| Protocol | Select "H.323" |
| Orig. IP Address | Set to 0.0.0.0/0 |
| Term. IP Address | Set to the IP of the JeraSoft Billing |
| Term. Port SIP | Set to 1720 |
| Enable RADIUS Authorization | Enable the checkbox |
| Enable RADIUS Accounting | Enable the checkbox |
BILLBERY_ROUTING
This gateway points to the JeraSoft routing server. The gateway configuration should look like the provided screenshot:

Set the "Equipment type" field to "Routing Server(RADIUS)".
Adding dial peer
Go to "Termination → Dial peers" and create a dial peer with settings that match the screenshot below:
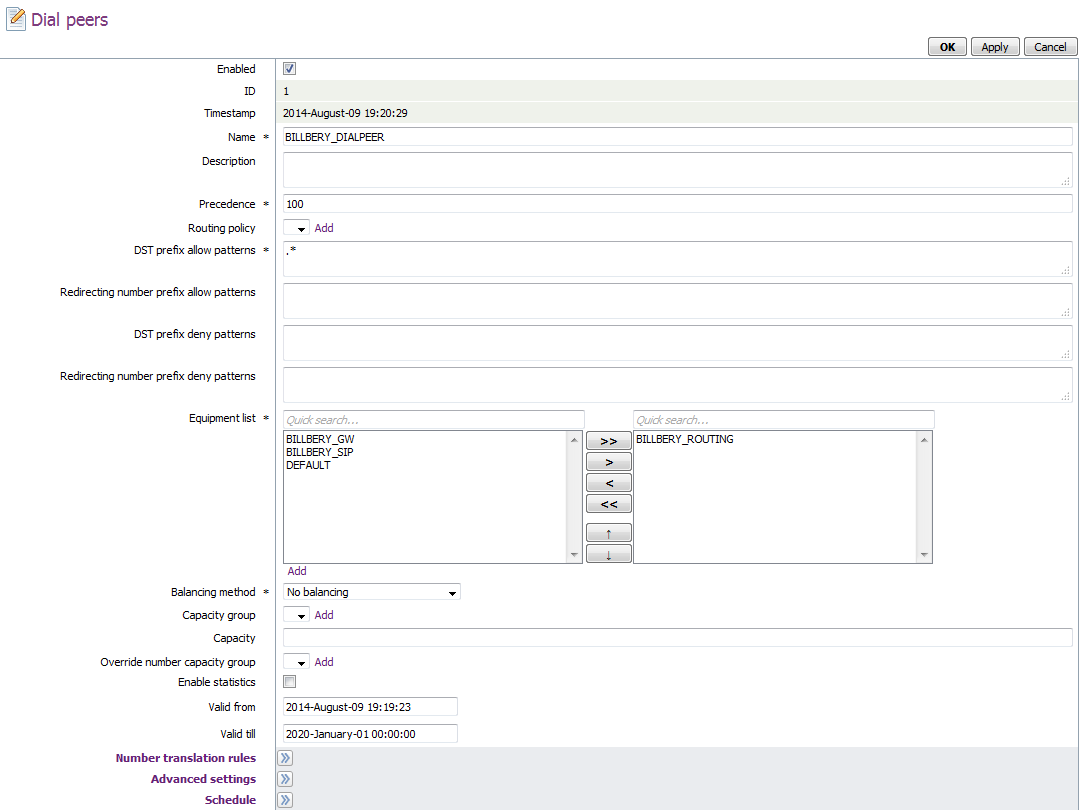
Please make sure that you specified the below-mentioned fields in the following way:
| Field | Description |
|---|---|
| DST Prefix Allow Patterns | Set to .* in order to router all traffic via JeraSoft Billing (you may set a specific pattern, to route only certain destinations) |
| Equipment List | Make sure that right column has only BILLBERY_ROUTING |