Accounts
Please do not remove Account entities completely from the system. It may cause distortions and overall mismatches in stored statistics. Instead, disable their Origination/Termination settings.
Section overview
This section is designed to create and manage all clients' Accounts in the system. Any Clients can have an unlimited number of unique Accounts. Accounts are a key tool for Clients' identification in JeraSoft Billing. The section is presented in the form of a table with the following columns:

| Column Name | Description |
|---|---|
| ID | Account's identification number |
| Client | Client's name |
| Account | Account's name |
| Name/ANI/IP | The way of clients' identification |
| Tech Prefix | Technical prefix for users' identification |
| Orig Details | Originator settings |
| Term Details | Terminator settings |
- It's possible to add multiple Accounts with the same IP address and different protocols/ports.
- When you delete an Account from the system, all associated statistics will be removed, amounts will be refunded and the client's balance will increase. We recommend deactivating useless Accounts instead of completely deleting them from the system. You can deactivate an Account by disabling Originator/Terminator Settings checkboxes.
The section contains the respective list of functional buttons and icons.
| Button/Icon | Description |
|---|---|
 | Allows creating a new client's Account |
 | Allows filtering Accounts by a specified Client |
 | Allows viewing specified client's profile in the Clients section |
 | Allows viewing client's change history in the Audit log section |
 | Indicates that the Orig/Term Rate Table or Routing Plan is assigned to an Account |
 | Allows deleting an Account from the system |
Advanced search
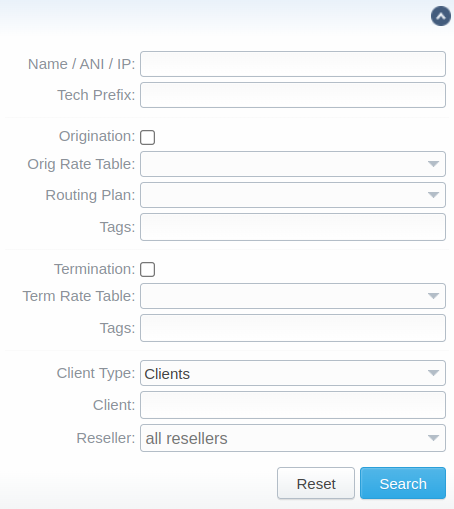
Use the Advanced Search drop-down menu for fast navigation in the section (for instance, displaying Accounts belonging to a certain Client) by clicking on a red downward arrow  icon.
icon.
You can start a quick search by typing your keywords into a target field and clicking the Search button.
Adding new account
To add a new Account, click the "New Account" button and fill in the respective fields. Then, click the "OK" button. The list of fields is as follows:
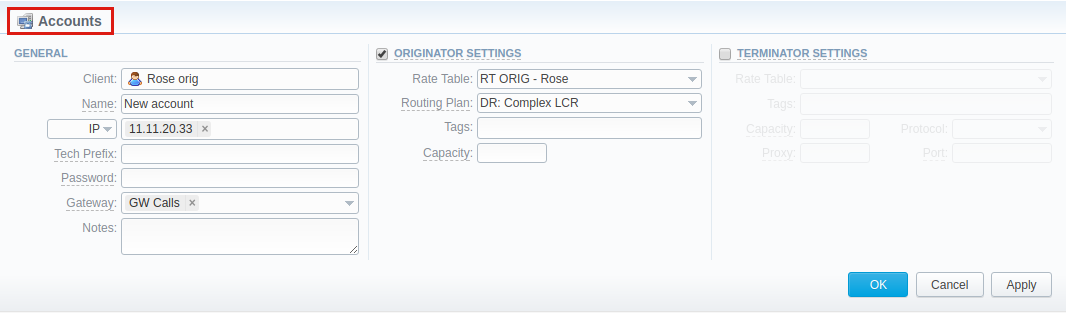
General
General information about a new client's Account
| Field | Description |
|---|---|
| Client | Specify a Client, to whom this Account belongs |
| Name | Define the name of an Account for JeraSoft Billing |
| Ident by | The JeraSoft Billing system allows Client identification in 3 different ways: - IP – gateway IP-address. You can specify multiple addresses, by dividing them with ";". Moreover, you can specify the subnet with mask here in CIDR-format, e.g., 10.0.0.0/24, 200.200.200.208/28 - Name – gateway name or user login, used for identification - ANI (Automatic Number Identification) – callee's or caller's phone number |
| Tech Prefix | Define technical prefix that is used to identify users, when multiple Clients use the same gateway |
| Password | Set a user's password that is used with login/password identification on a switch. Also, it can be used through the default authentication mechanism. For more info, please consult your switch system manuals. You can automatically generate a password or show it by clicking on the  icon or the icon or the  icon, respectively. icon, respectively. |
| Gateway | Specify a Gateway for the Account, which will be in use only when billing this host calls. It is possible to assign more than one Gateway to one Account. |
| Notes | Additional information about a current Account |
Originator settings
Settings for your customers, who send calls to your switch
| Field | Description |
|---|---|
| Rate Table | Select a Rate Table for a current Origination Account (it will have higher priority than a Rate Table set for the whole Client) |
| Routing Plan | Indicate a Routing Plan for a current Origination Account |
| Tag | Specify a tag for a current Origination Account |
| Src Policy | Controls whether outbound calls are allowed only from DIDs assigned to this account: - "Allow any" - allow calls with any Src Party ID - "Reject" - reject a call if Src Party ID doesn't match DIDs assigned to this account - "Overwrite" - overwrite Src Party ID with a randomly selected DID assigned to this account (if incoming request doesn't have matching Src Party ID) |
| Capacity | Set limitation for the number of simultaneous calls within this Account |
Terminator settings
Settings for your vendors, whom you send calls from your switch to
| Field | Description |
|---|---|
| Rate Table | Select a Rate Table for a current Termination Account (it will have higher priority than a Rate Table set for the whole Client) |
| Tag | Specify a tag for a current Termination Account |
| Routing IP | (ANI auth type only) Specify an IP address used for termination to this account |
| Capacity | Indicate capacity for respective traffic direction |
| Protocol | Select respective protocol for a current Termination Gateway |
| Proxy | Define proxy for a current Termination Gateway |
| Port | Set port for a current Termination Gateway |
- You can add an unlimited number of Accounts for each Client
- It's possible to add multiple Accounts with the same IP address and different protocols/ports or different gateways