How to configure a DIDs scheme?
Before diving into the DIDs configuration process, let's say you have a DID operator (Voxbone on a chart below) and a Client - holder of a DID Number (Client A). The Client A receives a call from someone (Client B). In this case, a calling party (Client B + Voxbone) will be originating a call, and the called party (Client A) will be terminating it.
On a chart below, you can see how this call will look like:

Now let's move on to the DIDs Scheme realization in your system.
Prior to creating the DIDs in your system, make sure you have at least two active Clients - an Originator (Voxbone) and a Terminator (Client A).
In your Clients Settings, to indicate the type of your Clients, create each one of them an Account with the respective origination or termination settings enabled.
Moving to the process of creating and assigning DID Numbers, it can be divided into several steps:
-
Go to the Retail → DID Inventory → Operators List tab.
- Create one or more Operators (DID providers). For this, click the "New Operator" button and proceed with filling in the form.

-
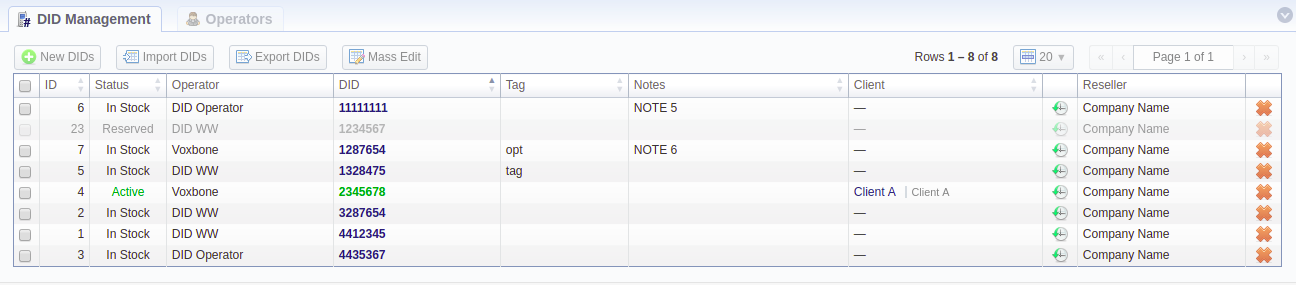
Open the DID Inventory section.
- Add one or more DID Numbers with or without Tags. When adding, set the "In Stock" status to be able to assign DIDs further on. You can also use the "Import DIDs" button to add new DIDs.
-
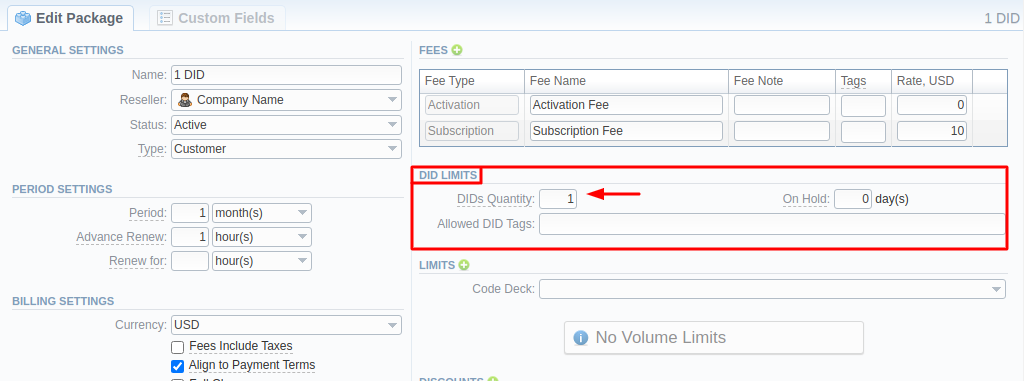
Go to the Retail → Packages section.
- Create a New Package that will include allowed DIDs quantity and tags specified in DIDs Settings (if applicable) in the DID Limits section.
-
Assign a respective Package to Client A that will hold a DID in the Client Packages section using the "Assign Package" button.

-
Open the Clients tab.
-
Click on a Client you want to assign a DID to, and open their settings.
-
Go to the DIDs tab, and add one or more DID numbers using the "Add DID" button. Note that DIDs can only be assigned to Accounts.

-
-
In the Routing Plans section, add a New Routing Plan with the "DID" type rule of highest priority (typically 0).

-
Add this Routing Plan to Voxbone (who is the Operator of DID Numbers) in the Clients'Settings.
-
In the Rates Tables section, create the respective Rate Tables for both Voxbone and Client A, and assign them accordingly.
- If you wish to pay Voxbone for the incoming calls, the Origination Rate Table will hold negative Rates;
- If you wish to charge Voxbone for the incoming calls, the Origination Rate Table will hold positive Rates;
- If you wish to charge nothing from Voxbone for the incoming calls, the Origination Rate Table will hold free (zero) Rates for the DID destination. Whereas the Termination Rate Table will be with the negative Rates so that Client A will pay you for the incoming calls.
The Termination Rate Table should have a Prefix for a DID number in the Code field for this scheme to operate correctly. If the customer has multiple DIDs with the same prefix, you can set a single Rate for that prefix instead of listing all DIDs.
-
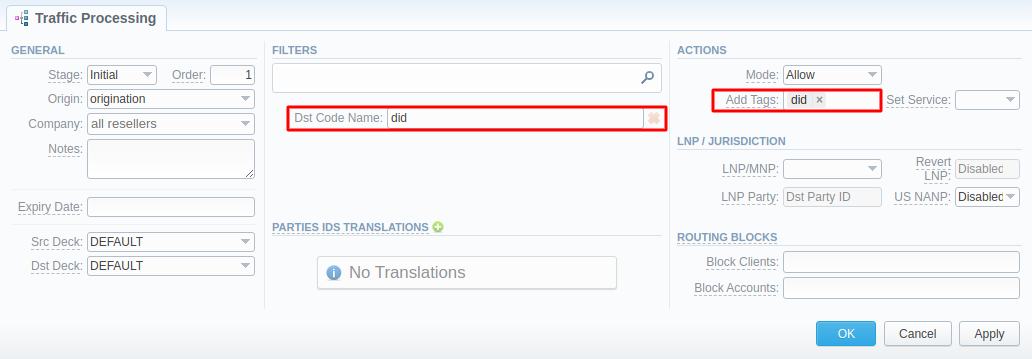
Create a Code Deck with all existing DIDs in your system and set the same name (i.e., 'did') for all of them. In the Traffic Processing section, create a rule with this Code Deck selected to "match by" Dst Code Name 'did' and add a Tag "did" to such calls. When adding the abovementioned rates to the customer, set tag "did" on them, to "match only" in case the number is an actual DID.
-
Run the DR manager and Traffic Rules manager in the System Services section (or remotely, using Terminal) to apply all the changes.
If you configured these steps right, in the Routing Analysis section of your billing system, you will be able to simulate a call between the parties to ensure the effective assigning of a DID Number.

Please note that this functionality is very switch-dependent, and additional development or testing may be required. Contact the JeraSoft Support team for help, if you have any doubts or questions.
While a call flow with Client A as a Terminating Client is configured a little complicated, when originating calls, the system sees it as any other regular Orig Client. Thus, the call flow to the Term Vendor will look like this:
