Transactions
Section overview
This section allows a user to perform and trace all the financial operations regarding the Client's/Reseller's balances. The section offers an overview of every single Transaction performed in the system regardless of whether it's payment or charge and provides a wide variety of functionality for Transactions management. Since the Transactions section is a key tool for managing Client's/Reseller's balances, it's inseparable from the following sections of the system: Clients, Invoices, Resellers, etc.
Transaction charges will be created according to the configurations of Tax Profiles, Rate Tables (including tax or not) and the next parameters:
- invoice time (transaction date);
- client ID;
- currency ID;
- positive or negative amount.
- In case you change one of the parameters listed above and the rerating is done, you might have additional transactions (with zero or non-zero taxes).
- When a customer has calls with and without taxes for the same hour, two charges will be listed in the transactions section: one charge with taxes and the second one without taxes.
- If you see a transaction with a tax represented as a dash (−), it means that all taxes were included in rate tables.
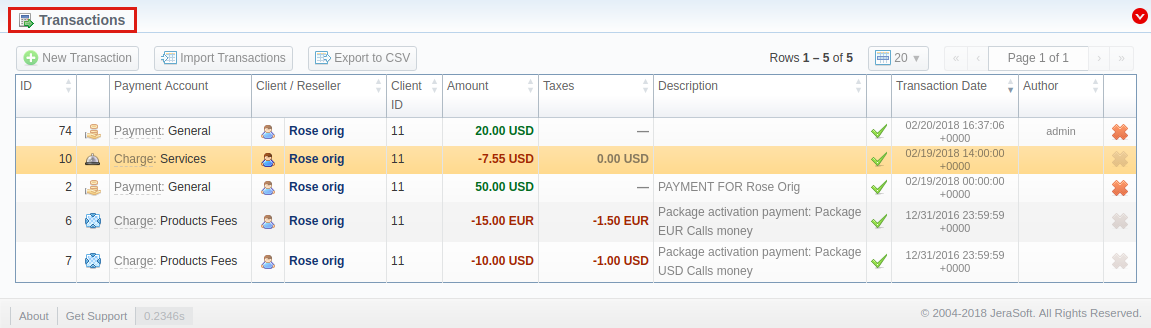
The section is presented in the form of a table of all conducted Transactions with the following columns:
| Column name | Description |
|---|---|
| ID | Payment through an ID number |
| Payment Account | Shows a respective payment account, related to a performed payment or a respective charge type, such as calls, products, extra charges (each type has a visual representation in a form of a respective icon) |
| Client/Reseller | Displays the name of a client or reseller that was engaged in payment operation |
| Client ID | Customer's identity |
| Amount | The respective payment operation sum |
| Taxes | An amount of taxes |
| Description | Comments about a respective payment |
| Transaction Date | Displays a respective payment date, related to a performed payment |
| Author | Name of the user who performed the latest transaction (regardless whether it's a payment or a charge) |
The list of functional buttons/icons is as follows:
| Button/Icon | Description |
|---|---|
 | Allows to create a new transaction |
 | Allows to import user's transactions into the system |
 | Allows to download a list of transactions in a .csv file |
 | Indicates the type of transaction - payment |
 | Indicates the type of transaction - extra charges |
 | Indicates the type of transaction - services charges |
 | Indicates the type of transaction - packages fees |
 | Indicates that a transaction is approved |
 | Allows deleting a transaction from the system. Requires confirmation |
Advanced search
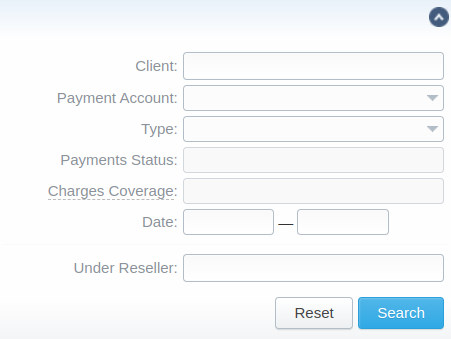
In the top right corner of the section above the table, an Advanced Search drop-down menu is located. By clicking on a blue downward arrow ![]() icon, a drop-down menu with the following structure is displayed:
icon, a drop-down menu with the following structure is displayed:
Author column is going to be filled only if a transaction has been added manually by a user through the Transactions section in JeraSoft Billing or the Refill Balance page on JeraSoft Client Portal. In case a transaction is automatically generated by the system, the Author column will be empty.
| Field | Description |
|---|---|
| Client | Indicate a client you wish the section to be filtered by |
| Under Reseller | Filter the list of all payments for the selected Reseller's Clients. This field can take multiple values. |
| Payment Account | Select from the list of all payment accounts in the system |
| Type | Select a type of transaction: Payment or Charge |
| Payments Status | Select from the list of transaction statuses: Pending or Approved. Only fillable when Type is Payment. |
| Charges Coverage | Select from the list: Invoiced (already covered by Invoices) or Not Invoiced (not covered by Invoices). Only fillable when Type is Charge. |
| State | Indicate whether you wish payments covered by the invoices to be displayed by selecting from the list: Covered or Uncovered |
| Date | Specify the date in the date picker |
After filling in the fields, click "Search" to filter section data or "Reset" to clear search results.
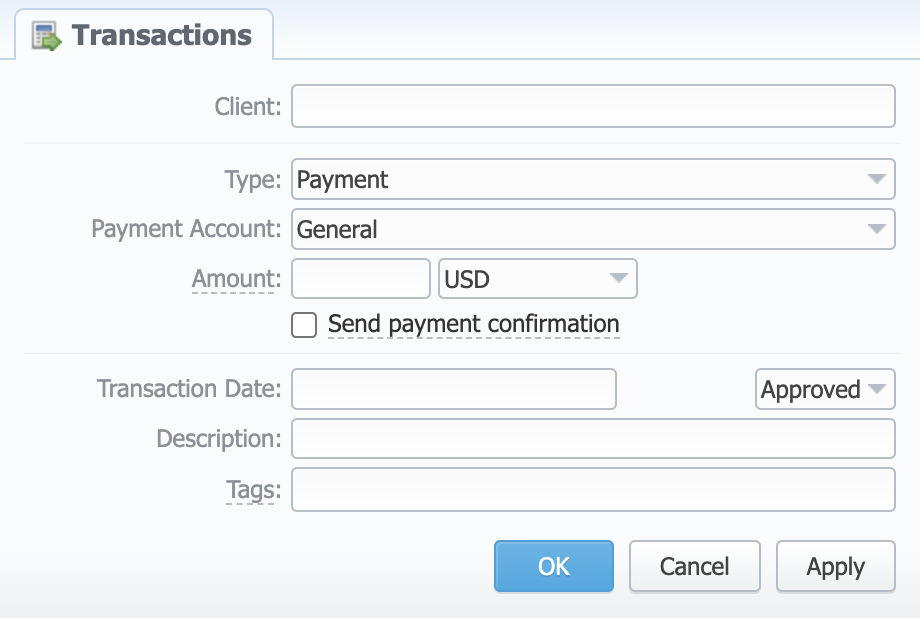
Adding a new Payment/Charge
To add a payment, click the "New Transaction" button. A new pop-up window will appear after that. Specify the following parameters and click the "Apply" button.
| Field | Description |
|---|---|
| Client | Indicate a target client |
| Type | Specify a type of Transaction. For Incoming Transactions, select Payment operation type, for Outgoing – select Charge. |
| Payment Account | Choose a respective account from the drop-down list of all available payment accounts. For charge type, you can select: extra charges outgoing or extra charges incoming. Note: you will have the same type of payment account in invoices — you can choose where the charge will appear in an outgoing/incoming invoice. |
| Amount | Insert an amount of the transaction, which can be positive or negative: positive amount is credited to a client, negative amount is debited from a client. Amounts can be specified with a comma as a decimal delimiter (e.g., "2,45"). For Charge type, you can choose whether the amount includes tax: no taxes, including taxes, or excluding taxes. The tax rate is based on the Tax Profile of the client's Reseller. |
| Send payment confirmation checkbox | Tick to send a notification about this transaction to Client's Billing Email |
| Transaction Date | Indicate the actual date of the transaction in a date picker |
| Description | Notes for a new transaction |
| Status | Define the state of the transaction: Pending or Approved |
If you change the transaction status in the respective field from Approved to Pending when adding a payment, this payment will have to pass additional approval check by a billing operator
When a customer has 2 calls (with and without taxes) for the same hour, two charges will be listed in the transactions: one charge with taxes and a second one - without taxes. In case you change one of the parameters listed above and the rerating is done, you might have additional transactions.
If you see a transaction with a tax represented as a dash (−), it means that all taxes were included in rate tables.
When the Reseller owns a payment account, transactions for this account can be created for Clients and Sub-Resellers belonging to this Reseller. However, transactions of this Reseller (owner of the account) cannot be assigned to this payment account.
Exporting and importing Transactions
By clicking the "Export to CSV" button, you will be able to export all currently stored payments in a .csv file.
You can easily perform an import of payments by clicking the "Import Transactions" button and following on-screen instructions:
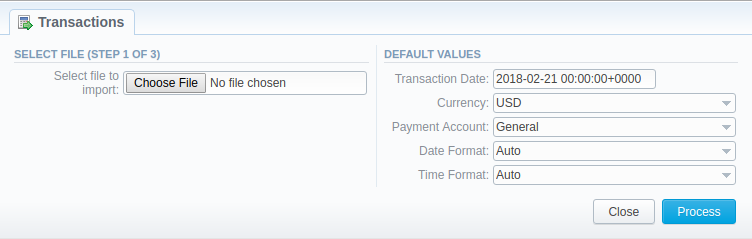
Step 1: Selecting a file and specifying additional parameters
Upload a file from your computer, indicate such default parameters as Transaction Date, Currency, Payment Account, Date and Time Format, and click "Process".
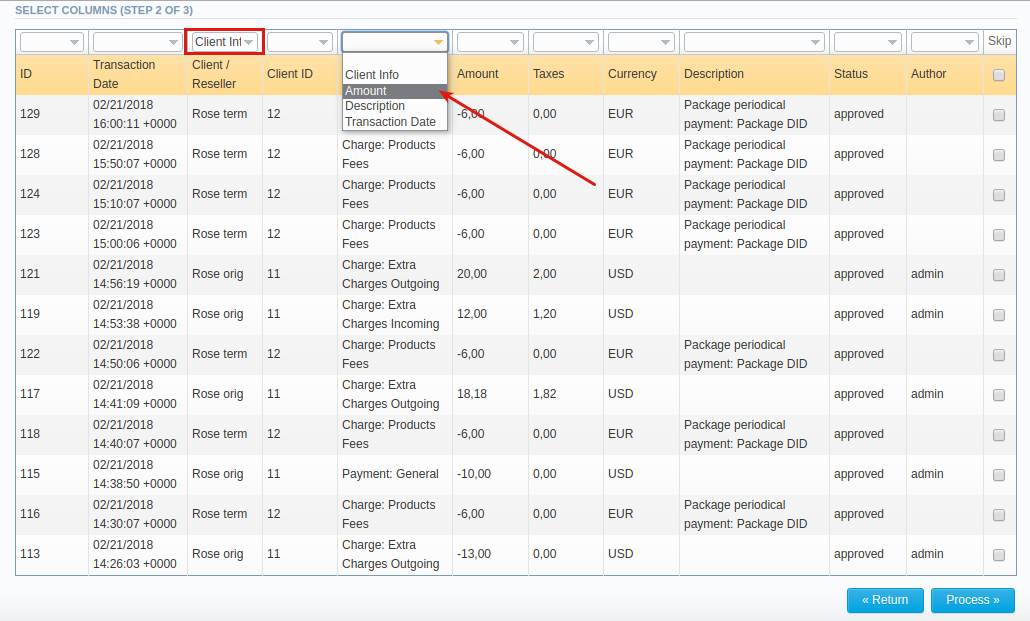
Step 2: Recognizing the file
The system will recognize the file and you need to select 3 mandatory columns: Client Info, Amount, and Transaction Date. Following this, click "Process>>" button again.
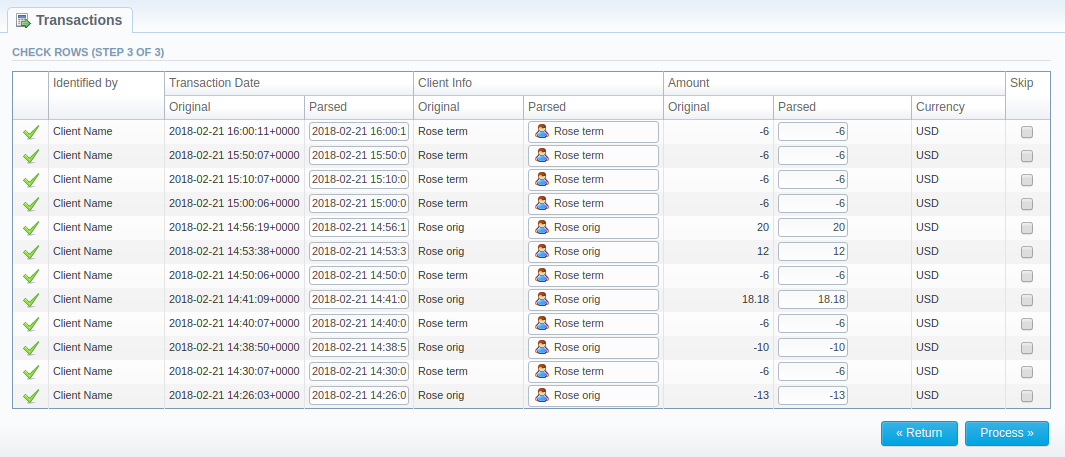
Step 3: Checking the rows
Having specified the required columns, you need to check the rows to make sure that no mistake has been made. On doing it, click "Process>>" to finish the importing process.