Docs for all releases
This documentation relates to an earlier version of JeraSoft VCS.
View User Guide 3.26 or visit our current documentation home page.
View User Guide 3.26 or visit our current documentation home page.
In this article
Section overview
Beyond any doubts, clients are a cornerstone and the most valuable asset of any type of business. Hence, the Clients section is rightfully considered a core element of the whole JeraSoft Billing. In the section, a user can manage the personal information of any client on the list, trace customer's balances, review resellers a particular client belongs to, etc. The section is presented in the form of a table with the following columns:
Screenshot: Clients section
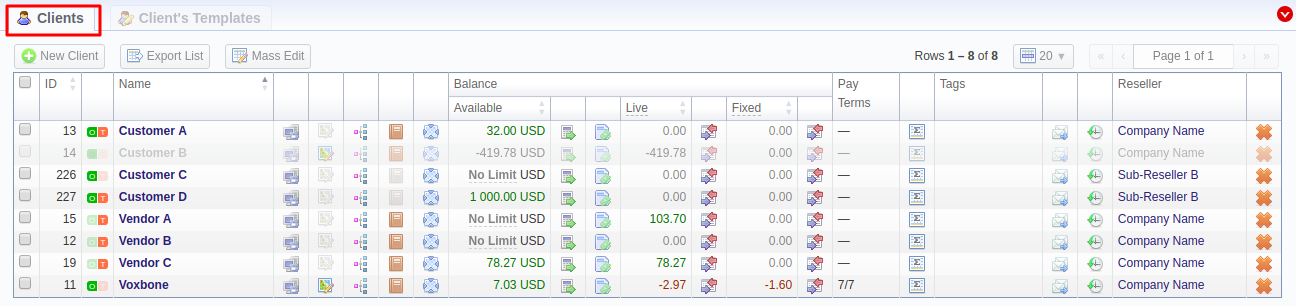
| Column Name | Description | |
|---|---|---|
| ID | Client's identification number | |
| Name | Client's name | |
| Balance | Client's balance values | |
| 'Live' client's balance including allowed credit | |
| Client's balance calculated on the basis of the performed payments and processed calls | |
| Client's balance calculated on the basis of the outstanding invoices and performed payments | |
| Pay Terms | Payment terms of each client | |
| Tags | List of tags, applied to a client | |
| Reseller | Name of reseller's company a respective client belongs to | |
Functional buttons and icons, presented in the section, are as follows:
| Button/Icon | Description | |
|---|---|---|
| Allows adding a new client to the system | |
| Allows exporting a list of user's clients in a .csv file | |
| Allows managing the last invoice date of a client | |
| Identifies the Orig client | |
| Identifies the Term client | |
| Identifies the Orig/Term client | |
| Allows accessing the list of client's accounts in the Accounts section (an icon will be colored if an account is assigned) | |
| Allows accessing the client's current routing plan (an icon will be colored if the plan is assigned) | |
| Allows accessing the Traffic Processing section for dynamic routing management | |
| Allows viewing client's rates (an icon will be colored if a rate table is assigned) | |
| Rate tables for origination calls | |
| Rate tables for termination calls | |
| Allows accessing the Subscriptions section for new clients packages management | |
| Allows accessing the Transactions section for client's balance management | |
| Allows accessing the Invoices section for client's invoices management | |
| Allows accessing the Balance Report section for client's balance report (Live or Fixed) management | |
| Allows accessing the Summary Report section for client's summary report management | |
| Allows accessing the Mail Queue section to view sent emails history | |
| Allows accessing the Audit Log section to view change history | |
| Allows deleting a client from the system | |


![]() Warning
Warning
When you delete the client by changing the status to deleted or clicking a respective icon  , the Client Panel of this client will be disabled and origination/termination settings of its accounts will be turned off. However, its accounts will not be deleted from the system.
- If the prepaid mode is enabled, calls will be subject to balance check on a stage of call authorization (when RADIUS Authorization is used). If the postpaid mode is enabled, calls duration will be limited to Max сall length setting in Configuration > Settings.
You can search through clients by Name and by first letters only (start with rule). To find all clients with a specified main email, use * (asterisk) in the Main Email field.
Advanced Search
In the top right corner of the section above the table, the Advanced Search drop-down menu is located. By clicking on a downwards arrow ![]() icon (clients in the section are filtered by Active status by default), the following drop-down menu is displayed:
icon (clients in the section are filtered by Active status by default), the following drop-down menu is displayed:
Screenshot: Advanced Search drop-down menu
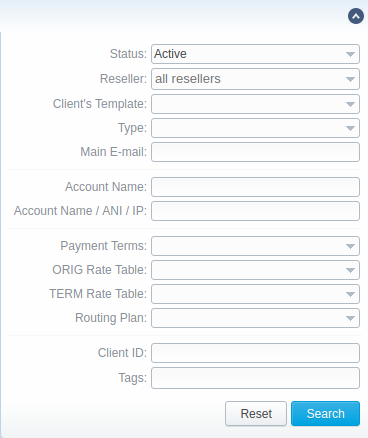
To apply the specified search criteria, click the Search button; to cancel the applied parameters, click Reset.
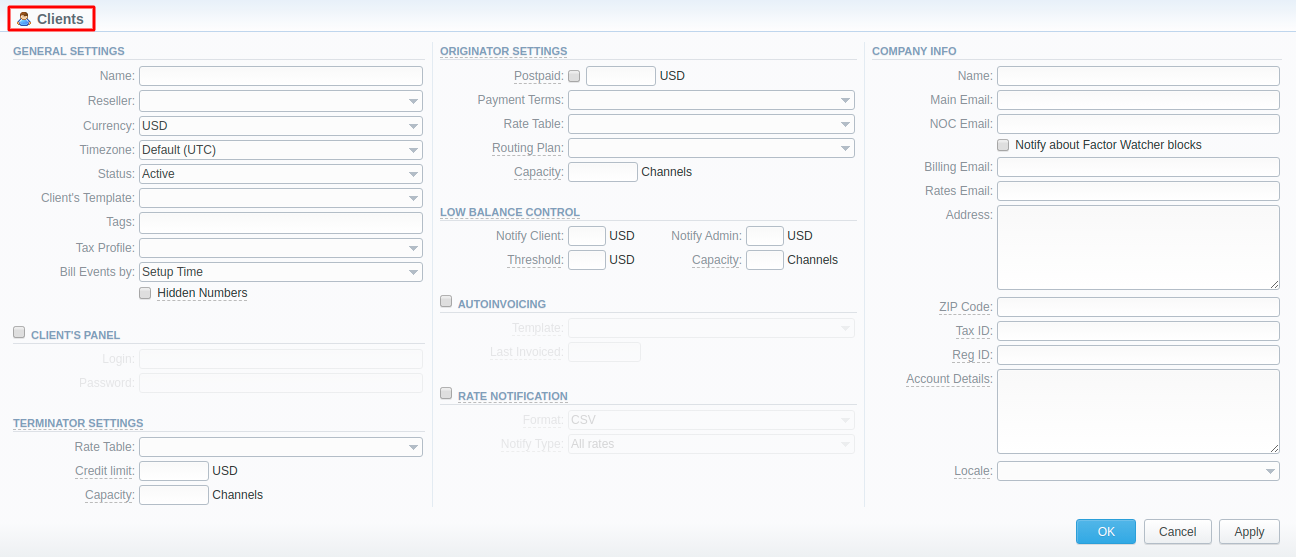
Adding New Client
To add a new customer in the system, click the New Client button in a top-left corner of the section. A pop-up window with the following fields will show up:
Screenshot: Adding a new client
| Information block | Fields & Description | |
|---|---|---|
| General Settings | General information about the client | |
| Indicate a client's name | |
| Select a reseller a new client belongs to (this name will be used in invoices) | |
| Define preferred currency (will be used in invoices) | |
| Choose the timezone from the drop-down list of all available. This timezone will be used in invoices by default. UTC is a default parameter for a timezone
If this parameter is not indicated, the timezone of the database will be automatically applied to the client's settings of the zone. It could lead to some problems while working with packages, rate tables, or time profiles. | |
| Select a respective status for the client:
| |
| Here you can apply the required template from the list to a new customer | |
| You can indicate tag(s) here that will be applied to a new customer. The tag doesn't need to be pre-existent in the system. You can provide an unlimited number of tags for each client. | |
| You can specify a tax profile, which will be reflected in invoices (refers to the Taxes Profiles section).
For proper usage of SureTax, the Invoice Number should contain only Latin and numeric characters. Max length is 40 symbols. Dst and Src Numbers should be in the NPANXXNNNN (10 digits) format. | |
| Select how the system should bill events of a new client – by setup time, by connect time or by disconnect time (most switch models use disconnect time) | |
| When checked, allows you to hide some part of the client's destination numbers in invoices, xDRs reports and during export. If the client has the Hidden Numbers option enabled and the code appears in the code deck from the invoice template, the number, code, and code name become hidden. If the code doesn't appear in the code deck, the last *n characters of the number are hidden. The code deck from the rate table is only used to identify code names. | |
| Client Panel checkbox | Activates/deactivates the login procedure to the client's control panel for this client. Customer can get access to this control panel by using the following link: http://vcs_address/clients/, after filling in the following fields: | |
| Client's login | |
| Client's password | |
| Originator Settings | Settings for your customers, who send events to your switch. Clients' originator settings are as follows: | |
| Here you can set the needed payment mode for a client. If you enable the postpaid mode, the client will have unlimited credit. It is disabled by default. | |
| The additional field next to the Postpaid checkbox. Here you can set the credit limit allowed for a client. You could fill this field with any of the positive or negative numbers, but no more than 9 digits. If the Postpaid checkbox is marked, this field becomes inactive. | |
| Select the payment terms template from the general list of all available ones in the Payment Terms section | |
| From the list of all rate tables in the Rate Tables section, select an origination one for this client | |
| Select an appropriate routing plan that will be used to route all calls of this customer (but it may be overridden for any of the customer's accounts in the Accounts tab). The full list of routing plans is presented in the Routing Plans section | |
| Indicate the origination capacity of channels for this client. For unlimited amount, leave empty | |
| Terminator Settings | Settings for your vendors, whom you send events from your switch. Clients' termination settings are as follows: | |
| From the list of all rate tables, select a termination one for this client | |
| Define the credit limit you have on the vendor's side. It will be applied to vendors during the routing check to remove them from the routing result if vendor balance + credit limit hits the entered threshold. | |
| Define the termination capacity of channels for this client. For unlimited amount, leave empty | |
| Low Balance Notifications | Here you can set up whether the system should send low balance notifications or not when the client's Available balance is lower than a set threshold | |
| When clients' balance+credit is below the entered value, the system will send a notification to email, specified in the clients' Billing Email field | |
| When clients' balance+credit is below the entered value, the system will send a notification to an administrator via Events Log | |
| Available balance threshold, below which the special capacity setting will be applied | |
| Origination capacity limit that will be applied when the available balance is below the threshold | |
| Autoinvoicing checkbox | Activates/deactivates the automatic invoice generation feature for the current client. Information block parameters are: | |
| Select an invoice template for this customer | |
| Specify the last date when the client was invoiced | |
| Rate Notification checkbox | Here you can enable or disable automatic rates notifications for the current client | |
| Select the desirable format of rate notification (.xlsx or .csv) | |
| Specify a type of notification:
| |
| Auto Payment checkbox | Activates/deactivates the automatic charge from customer's credit card registered in the Authorize.net electronic payment service. Please note that you can register a credit card via the Refill balance section on the Client Panel. | |
| Define a payment amount | |
| Company Info | Some additional information about a client can be entered here | |
| Company name | |
| Company email for general inquiries. Use only Latin characters. | |
| Company email for technical related questions. Use only Latin characters. | |
| This tool watches over different parameters and generates alerts if some conditions are met. This function is optional, i.e. you can enable or disable it in the Clients form | |
| Automatically generated invoices and notifications will be sent to this email address. Use only Latin characters. | |
| Company email for rates related questions. Use only Latin characters. | |
| Physical company address | |
| Postal code for SureTax integration | |
| Customer's tax ID | |
| Customer's registration ID | |
| Reference information about the client's bank account or payment details | |
| The preferred locale that will be sent as a reply to RADIUS Authorization. It is used for IVR platforms to define the language | |
![]() Attention
Attention
Autoinvoicing tool sends rates in separate files for each time profile used in a certain Rate Table.
Please note that the email address should contain only Latin characters for proper work of email notifications and invoices.
![]() Warning
Warning
The Full Delete button can be used to remove a client from the system permanently, disregarding any statistics or rate tables data connections. Please use this feature with care as the deleted client cannot be restored by any means
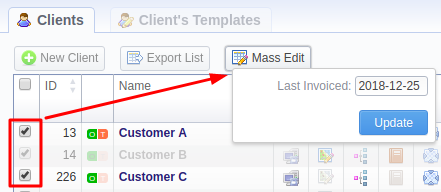
Mass Edit
If there is a need to change the last invoice date (i.e. the day that the client has already been invoiced for) for more than one client, you can use Mass Edit functionality. Follow the next steps:
- Select target Clients;
- Click the Mass Edit button and specify the date in the Last Invoiced field;
- Click the Update button.
Screenshot: Mass edit functionality
Clients Templates
This section allows you to create a client template, where you can specify the main information about a client, originator settings, etc. Further, this template can be used to set the billing and tariffication parameters for customers, managers, or resellers in several clicks. For more details, check out a related article: Clients Templates.
Knowledge Base Articles
Overview
Content Tools