Docs for all releases
This documentation relates to an earlier version of JeraSoft VCS.
View User Guide 3.26 or visit our current documentation home page.
View User Guide 3.26 or visit our current documentation home page.
In this article
Section Overview
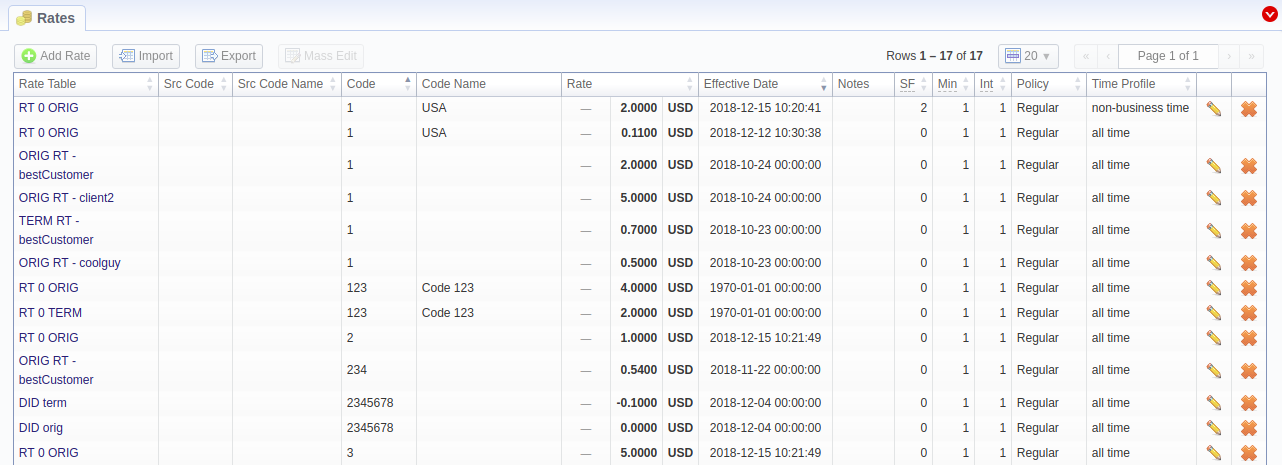
This tab is a cornerstone of the whole section, containing the list of all codes with indication of personal parameters. The tab allows adding new rates, as well as their mass editing and exporting.
Screenshot: Rates window
Adding New Rate
To create a new rate for a target code, you need to click Add Rate and the following fields will appear:
| Field | Description | |
|---|---|---|
| Src Code | Specify a source code for a new rate. You can add a code to the already chosen code deck while creating a new rate. To do it, while indicating a new one for a rule, click on the plus
Please note that rates with Src Codes are not used when termination tariffs are chosen for Dynamic Routing. This functionality is going to be reworked in the upcoming releases. | |
| Src Code Name | Indicate a source code name in case a source code is not specified (available if a code deck is attached). If an Src Code Name is specified, the Src Code field becomes disabled and vice versa. | |
| Dst Code | Indicate a destination code for a new rate. | |
| Dst Code Name | Name of a destination code group (available if a code deck is attached) | |
| Rate | Price per unit of a service. Here you can see changes (how current rate differs from previously effective on) by clicking the up/down arrows | |
| Effective Date | Rate start date (newest available rate for a particular destination) | |
| Min | Minimal time of call that will be tariffed. For example, if total call time was 20 seconds and Min is 30, the client will pay for 30 seconds of the call. | |
| Int | Tariffication interval. For instance, if call time is 26 seconds, Min is 25, and Int is 8, the client will pay for 33 seconds | |
| Extra Fields | Additional parameters are stored under the gray downwards arrow | |
| Specify a tag for the respective rates. If it's not applicable, assign a (@) tag as default. | |
| This option allows selecting a rate type for a code: regular rate or an additive (extra) rate:
During billing, the system takes one regular rate and all additive (extra) rates that are appropriate for the call. Please note, a regular/additive rate table will be determined by accessible dynamic and static tags used for the call. | |
| Time profile that will be used for a current rate. For example, business time, non-business time, weekends, etc. | |
| After a specified date, the target rate will not be used. | |
| Setup fee (charged when event duration is longer than 0 seconds). | |
| Time interval that will not be tariffed (free time). For instance, if you specified 5 sec as Grace Time , all calls with duration up to 5 seconds (including calls with session time of 5 seconds) will be free of charge. | |
| Specify a minimum and maximum length of destination number. For example, if you have a rate of 3 USD for 123 Dst Code with indicated number length from 6 to 9, and another rate of 5 USD for the same 123 Dst Code without specified number length, all calls with a Dst Number between 6 and 9 digits will be billed by 3 USD , otherwise, by 5 USD. | |
| Additional information about current rate. | |


After you finish filling in all fields, click ОК.
Also, you can export the rates quickly by clicking the Export Filtered button or opening the Export tab.
Mass Rate Edit
It's possible to make a mass update of the rates by clicking on Mass Edit for the drop-down menu to appear. Then, you need to fill in the fields according to your needs. There are four general parameters that can be applied to a field:
- preserve - the default configuration that saves the rate not edited. Leave this parameter unchanged if required;
- set to - it allows to edit rates, for example, specify the same effective date for all rates at once, regardless of previous configurations;
- inc for - here you can indicate how the original value increased;
- dec for - here you can indicate how the original value decreased.
The list of mass edit fields is as follows:
Screenshot: Mass Edit button

| Field | Description |
|---|---|
| Status | Change rates statuses. Available options: preserve, set to |
| Rate | Change rates values. Available options: preserve, set to, inc for, dec for. You can increase or decrease the value either by fixed number or percent. To increase or decrease by percent, enter % sign after the desired number.
Do not enter non-numeric symbols. |
| Setup Fee | Change setup fee values. Available options: preserve, set to, inc for, dec for. You can increase or decrease the value either by fixed number or percent. To increase or decrease by percent, enter % sign after the desired number.
Do not enter non-numeric symbols. |
| Tag | Change rates tags. Available options: preserve, set to |
| Min. Volume | Change minimal volume values. Available options: preserve, set to |
| Interval | Change tariffication interval values. Available options: preserve, set to |
| Grace Volume | Change grace volume values. Available options: preserve, set to |
| Effective Date | Change rates start date values. Available options: preserve, set to |
| End Date | Change rates end date values. Available options: preserve, set to |
| Profile | Change rates profiles. Available options: preserve, set to |
| Notes | Change rates notes. Available options: preserve, set to |
| Number Length Min | Change minimum length of destination numbers. Available options: preserve, set to |
| Number Length Max | Change maximum length of destination numbers. Available options: preserve, set to |
After indicating the necessary fields, click the Preview button. You will see a new rate table with edited details, where you can choose one of the following options:
- By clicking Insert As New, the edited rates will be added as new ones that will replace existent under specified conditions (for example, change of rate and effective date);
- By clicking Update Current, the edited rates will have their values updated with the new ones;
To delete all displayed rates, click Delete All in a Mass Edit menu.
Advanced Search
Use the Advanced Search drop-down menu (see screenshot) by clicking on a red downwards arrow ![]() icon in the top right corner of the tab. To open additional settings, click the Advanced button.
icon in the top right corner of the tab. To open additional settings, click the Advanced button.
Screenshot: Rates tab search settings

| Field | Description | |
|---|---|---|
| State | Search by the period of a rate during which the rate is active, expired, etc., as compared to the date specified in the next field. The following states are available to choose from a drop-down list:
| |
| Code/Name | Search by the title or code | |
| Tag | Search by an assigned tag | |
| Imported File | Search by the title of an imported file, choose a file from the drop-down list of all available. If the list is empty, there are no imported files. | |
| Difference Status | Search by the cost changes of the rate. The following types are available to choose from a drop-down list:
| |
| Status | Search by the state of the rate:
| |
| Rate | Search by the rate, the price interval could be specified | |
| Setup Fee | Search by the setup fee of the rate, the interval could be specified | |
| End Date | Search by the expiration date of the rate | |
| Min Volume | Search by the minimal volume of event that will be tariffed | |
| Interval | Search by the tariffication interval | |
| Profile | Search by the time profile of the rate | |
| Grace Volume | Search by the interval of the free time | |
| Number Length | Search by the length of the destination number | |
![]() Attention
Attention
When you filter rates by the state (for example, current/new, future for, current on), the stashed (not-confirmed) rates will not show up in the search results. To include these rates, choose all from the drop-down list.
Stashed rates
If you see the rate rows colored in yellow, it means these rates are in pending state and you need to confirm them all (click the Confirm Filtered Rates button). Unconfirmed rates appear during the import process.
Screenshot: Rates tab settings

Overview
Content Tools