Docs for all releases
This documentation relates to an earlier version of JeraSoft VCS.
View User Guide 3.26 or visit our current documentation home page.
View User Guide 3.26 or visit our current documentation home page.
In this article
Section overview
Routing Plans section is available if your JeraSoft VCS includes the Routing Module. To access Routing Plans section, please log in to your system and go to Routing > Routing Plans.
This section allow to manage your routing rules for customers, providers and destinations. Each routing plan should be assigned to a respective customer (originator) for proper work of routing process.
You can combine both routing rules (dynamic and static) while creating a routing plan, also assign separate rules to each destination. Here you can find a list of created routing plans.
Screenshot: Routing Plans section
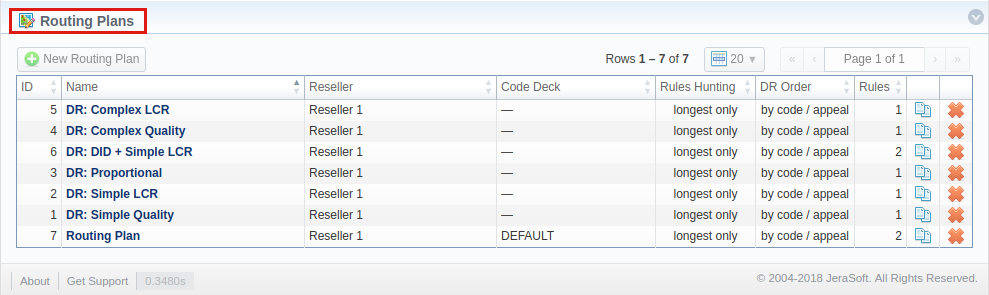
| Column | Description | |
|---|---|---|
| ID | ID number of a routing plan | |
| Name | Name of a routing plan | |
| Reseller | Name of reseller, a corresponding routing plan has been assigned to as owner | |
| Code Deck | Name of code deck that has been applied to a corresponding routing plan | |
| Rules Hunting | A respective hunting rule that has been applied to a routing plan | |
| DR Order | A name of dynamic routing order that has been selected to organize routing rules | |
| Rules | An amount of rules specified in a respective routing plan | |
Functional buttons/icons, presented in the section, are as follows:
| Button/Icon | Description | |
|---|---|---|
| Allows to create a new routing plan | |
| Allows to copy an existing routing plan to the section | |
Advanced Search
In the top right corner of the section above the table, an Advanced Search drop-down menu is located. By clicking ondownwards arrow ![]() icon, a drop-down menu with the following structure is displayed:
icon, a drop-down menu with the following structure is displayed:
Screenshot: Advanced Search drop-down menu
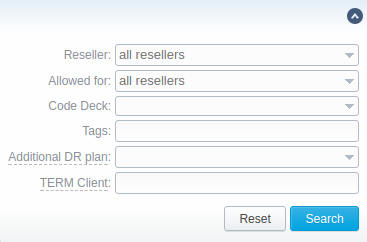
| Field | Description | ||
|---|---|---|---|
Reseller | Select from the list of all Resellers, Sub-resellers and Managers registered in the system | ||
| Allowed for | Select from the list of all Reseleers, Sub-resellers and Managers that are assigned to routing plan in Origination Limit field | ||
| Code Deck | Select from the list of all Code Decks in the system | ||
| Tags | Specify a certain Tag that was added to routing plan | ||
| Additional DR Plan | Select a routing plan that was assigned as an additional in Additional Routing Plan field | ||
TERM Client | Specify a termination client that was assigned to any of a routing plan rule | ||
To apply the specified search criteria, press Search button; to cancel the applied parameters, press Reset button.
Adding New Routing Plan
To create a new routing plan press New Routing Plan button, and fill in the following fields in the pop-up window.
Screenshot: Routing Plans window
| Information block | Fields description | |
|---|---|---|
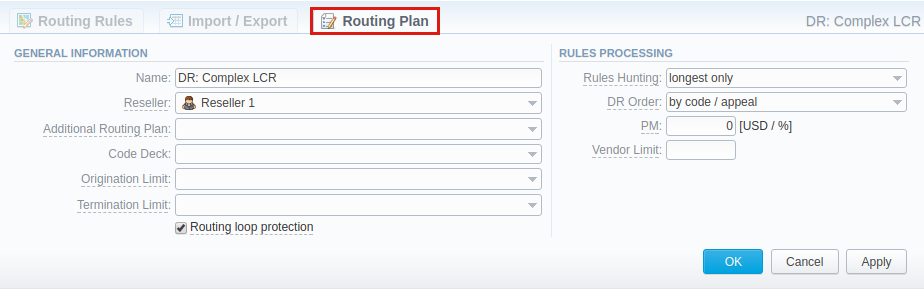
| General information | General routing plan information | |
Name | Title of a routing plan | |
Reseller | Define the reseller/owner of a current routing plan | |
Additional Routing Plan | Specify DR plan which will be addiitonal for current plan | |
Code Deck | Select a Code Deck if you wish to have names of your code to be specified in the Code Name field | |
Origination Limits | Define company or companies which will have access to this routing plan (also this restriction will be extended to their sub-companies) If there is no specified company, the following routing plan is available for all companies. | |
Termination Limits | Select company or companies which will have limit in termination for vendors who use it (sub-companies are not included) | |
Rooting Loop protection checkbox | Excludes originating client from the list of terminators. If it is unchecked, it will be possible to route calls between different accounts of the same client. It is enabled by default. | |
| Rules processing | Options of rules processing | |
Rules Hunting | Select a hunting mode (the way how rules will be executed). They are as follows:
By default, longest only option is set. | |
DR Order | Specify a method of routes sorting in routing table. The options are:
By default, by code / appeal option is set. | |
PM | Define a Profit Margin value for current rule here. In can be specified either as a percent value (e.g. 16%) or in a system currency (e.g 5 for 5 USD) | |
Vendor Limit | Determine the number of allowed routes for the same vendor to use (if a vendor has multiple accounts). You can set the limit only for accepted account routes, not including the accounts blocked by the term groups. If the field is left empty, the number is unlimited. | |
![]() Attention
Attention
Please note that Origination Limit and Termination Limit fields are visible only during:
- new routing plan creation;
- editing of already created routing plan if specified Reseller of this routing plan has at least one sub-reseller or manager.
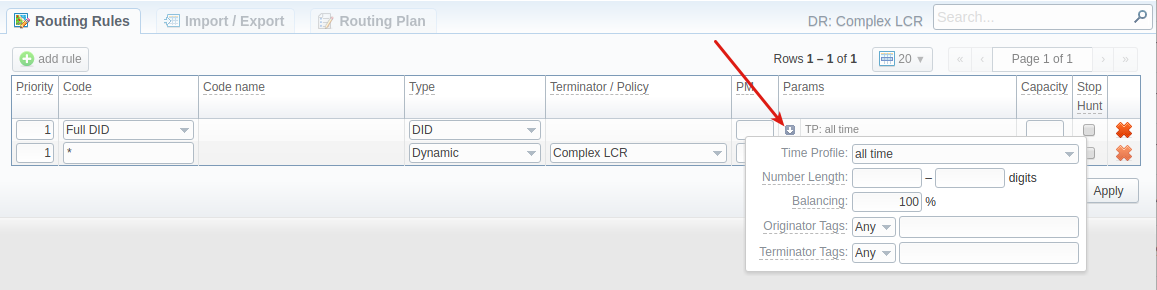
Routing Rules tab
Once a routing plan has been created, routing rules are to be determined (see screenshot below). To do that, click on routing plan's name and you will enter Routing Rules tab, then press Add rule button and fill in the following fields:
Screenshot: Routing Rules tab

| Field | Description | ||
|---|---|---|---|
| Priority | Define a priority of rule execution if two or more rules have similar code or code name specified | ||
| Code | Enter a code which will be used in current routing rule, use * as wildcard. If DID type for current routing rule is selected, you may specify a code:
By default, Full DID option is selected. | ||
| Code Name | If you have a code deck assigned to this routing plan, a corresponding name of code, specified in Code field, will be displayed automatically. If no code deck is attached, field will remain empty. | ||
| Type | Select a type of routing for a current rule:
| ||
| Terminator / Policy | If you selected static type, you may specify a termination client/account here; if you selected dynamic type, specify routing policy for the current rule | ||
| PM | Define a Profit Margin value for current rule here.
If PM field has been specified both for the entire routing plan and for a certain rule, the latter has a higher priority. | ||
| Params | A number of additional parameters available by clicking on | ||
| Specify time profile from the list | ||
| Set minimum and maximum length of destination number, that will be matched by this routing rule | ||
| Define percentage or proportion amount of traffic which will be sent to respective vendor who participates in balancing
Please note that after changing balancing value, it is needed to restart SIP and/or RADIUS daemons. | ||
| You can here specify respective originator tags. If nothing is specified, it works for all. all - applies for originators if all specified tags are present. | ||
| Here you can add terminator tags that that will be used for terminators. If nothing is indicated, it works only for terminators without tags. Please note, this parameter is available only for dynamic rules | ||
| Capacity | Limit capacity for the current rule (leave blank for unlimited) | ||
| Stop Hunt checkbox | If this field is checked, this means that rule search will be stopped when matched with the current one and all the consecutive rules will not be executed for current call | ||
Screenshot: Routing rules settings
Import / Export tab
Import / Export tab allows user to either upload a desired routing rules (choose a file on a computer through a form and press Process button) or download current routing plan rules in .csv file by pressing Process button (see screenshot).
Screenshot: Import / Export tab

Please pay attention that the column order in importing file must correspond to the one presented on the screenshot below.
Screenshot: Importing file format

![]() Attention
Attention
After all info has been entered and rules created, you need to go to Management > Clients / Accounts sections and assign this routing plan to one or more of your origination clients or client's accounts.
Routing Plan
If you wish to change your routing plan settings, you can always do so by going to Routing Plan tab. The list of fields in a tab is identical to that on a routing plan creation page (see screenshot below).
Screenshot: Routing Plan tab
Knowledge Base Articles
Overview
Content Tools