Docs for all releases
This documentation relates to an earlier version of JeraSoft VCS.
View User Guide 3.26 or visit our current documentation home page.
View User Guide 3.26 or visit our current documentation home page.
In this article
Section overview
This section represents local databases of the two providers: Numuri and TJA. Here, you can find the list of Numuri ranges and TJA numbers downloaded by Files Collector. It's intended to facilitate the administration of number portability. Number Portability refers to the ability to transfer either an existing fixed-line or mobile telephone number assigned by a local exchange carrier and reassign it to another carrier.
TJA (RN): During translation of the call, the system verifies the code of a TJA number, identifies the number, and changes the Dst Number to 372+RN Number.
Numuri/TJA (Owner): During translation of the call, the number is verified and the system applies a dynamic tag (owner's name) to the call for further billing.
The section consists of 3 tabs:
- Number Portability
- Gateways
- Downloads History
Number Portability tab
Tab is presented in a form of a table of ranges of numbers with a following columns:
Screenshot: Number Portability

| Column Name | Description | |
|---|---|---|
| ID | Identification number of a number range | |
| Range Start | Starting number in a respective range | |
| Range End | Final number in a respective range | |
| Owner | Name of a number range owner | |
| Modification Date | Indication of the latest date of numbers range modification | |
Functional buttons/icons that are present in a section are as follows:
| Button/Icon | Description | |
|---|---|---|
| Allows creating a new range of numbers for Numuri provider | |
| Allows adding a new number for TJA provider | |
| Allows managing an existing range of numbers on a list | |
| Allows deleting a range of numbers from the system. Requires confirmation | |

Advanced Search
Use the Advanced Search drop-down menu for fast investigation in this section. This tool provides a filter to limit the search results for higher working efficiency. By default, section data is filtered by Numuri provider. To display TJA provider data, in a drop-down menu select TJA in Provider field. click on the blue downwards arrow ![]() icon.
icon.
Screenshot: Number Portability section

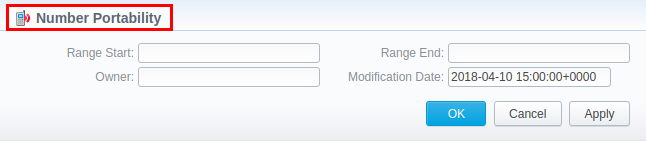
Creating a New Range/Number
To create a Numuri range of numbers, click the New Range button and specify the fields listed below. After that, click OK.
Screenshot: Number Portability section/Numuri range creation form
| Field | Description |
|---|---|
Range Start | Set the range's start position |
Range End | Set the end position |
Owner | Determine an operator that owns a respective range of numbers
Further, the owner's name will be applied to the call as a tag (for example, EU Carrier 1) for billing the call. |
Modification Date | Indicate the last modification date |
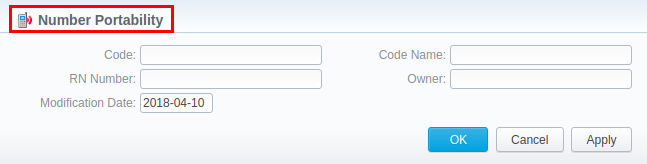
To add TJA number, click the New Number button, specify the required fields, and confirm number creation by clicking OK. The list of fields in a creation form is as follows:
Screenshot: Number Portability section/TJA number creation form
| Field | Description | |
|---|---|---|
Code | Specify the code of a TJA number | |
RN Number | Indicate a registration number | |
| Modification Date | Indicate the last modification date | |
Code Name | Specify a respective code name of a TJA provider | |
Owner | Determine an operator that owns a respective number | |
Gateways tab
![]() Attention
Attention
In VCS 3.17.0, for the purpose of making the Traffic Processing section more versatile, the TJA gateway has been divided into TJA (Routing Number) and TJA (Owner) (more information can be found in this article). Please note that each gateway in the tab has its own unique and predefined format of LNP update file, thus, we recommend to address our support center to avoid any possible issues while configuring the gateways.
Apart from Numuri and TJA, JeraSoft VCS is integrated with the following providers:
- Broadvox
- Vera Networks
- PCT
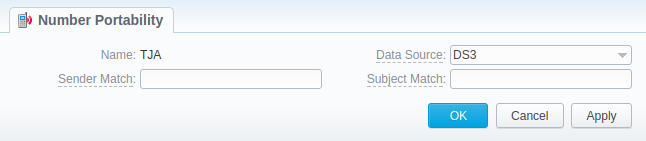
The Gateways tab is presented in a form of a table of gateways of all 6 above-mentioned providers with indication of its name and assigned data source. However, only Numuri and TJA can be managed. To assign a new data source to a gateway, click on a respective gateway name and specify a target data source in a corresponding field (see screenshot below). Depending on a selected data source, additional fields may differ (see Data Source section):
Screenshot: Numuri gateway management
Downloads History tab
Downloads History tab displays files downloading history through one of the number portability gateways. It is presented in a form of a table where ID, gateway name, filename, download date and file size are specified. Also, you can remove files from the list by selecting them and clicking on the Delete button above the tab.
Screenshot: Downloads History tab

LNP/MNP Configuration
LNP/MNP configuration can be divided into 2 steps:
- Set up download of external data to local LNP/MNP databases
- Configure communication between VCS and these databases
Step 1
To configure a download of external data, namely LNP/MNP file updates, you need to:
- Open Data Source section and create a new data source with IMAP or Web (Numuri) connection type.
Go to the Gateways tab of Number Portability section and open TJA or Numuri gateway settings.
Assign IMAP or Web (Numuri) data source to a respective gateway.
 Tip
Tip- IMAP - mail mode to download files. For this type, the format of the file must be *csv.zip.
- Web (Numuri) - web mode to download files. For this type, the format of the file must be *csv.
At first, downloaded files will be displayed in Downloads History tab. After being parsed by the Files Collector tool, numbers will be displayed in the Number Portability tab.
Step 2
The next stage is to configure VCS addressing to our local LNP/MNP databases during routing. To do so:
- Go to the Traffic Processing section and create a new rule or open settings of an existing one.
- Select a target provider from the drop-down list of LNP/MNP field and apply settings.
Congrats! Your LNP/MNP is configured and ready for work.
Overview
Content Tools