Docs for all releases
Page History
...
| Panel | ||||||
|---|---|---|---|---|---|---|
| ||||||
Imported rates will be marked as Unchanged, Increased, or Decreased only if their Effective Date value (e.g., 04.25.2018) is higher than Effective Date of a current rate (e.g., 04.10.2018) and they don't have an End Date value. If the End Date value is present in a previous rate, the fresh one will be marked as New. |
| Panel | ||
|---|---|---|
| ||
|
Import Tab
The tab is designed to provide a user with a possibility to import rates to JeraSoft Billing by uploading a .csv or .xls file. The whole process can be divided into several steps discussed below. You can access the rates import by clicking the Import button in the Rates section:
Screenshot: Import button
| Note | ||
|---|---|---|
| ||
The button will only be active when you filter the rates by the rate table. |
Step 1. Selecting a File and Specifying Additional Parameters
The first thing you need to do in the import configurations view is to select a rate table (the import template will autocomplete if existent). Then, drag-and-drop or upload an import file. Additionally, you can specify the following parameters:
Screenshot: Step 1. File Settings
...
| Panel | ||||||||
|---|---|---|---|---|---|---|---|---|
| ||||||||
Warning
|
Step 2. Import Settings
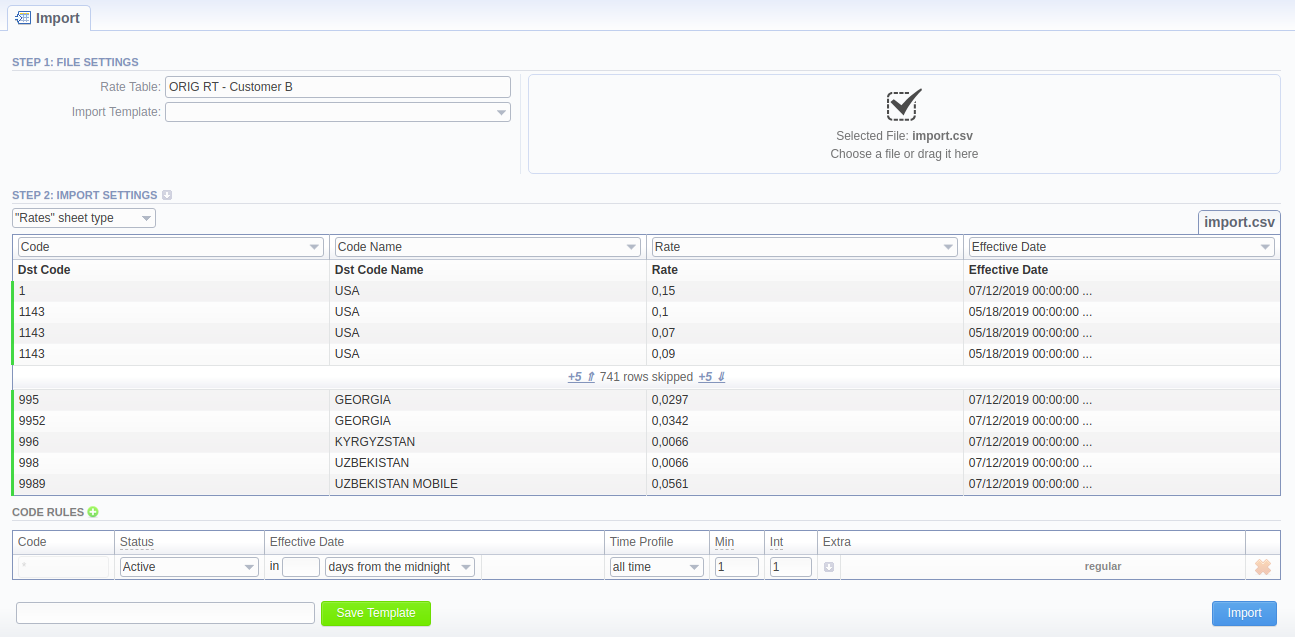
The system will recognize the file and display the first and last 5 rows of the first sheet. You will need to select the start and end lines of an import table (marked green). The middle lines are skipped, you can unfold them both ways by five lines by clicking the respective buttons. To switch from one sheet with rates to another, click on a respective tab: i.e., Sheet 1, Sheet 2, etc.
Screenshot: Step 2. Import Settings
...
- Rates type - an equivalent to an importing page from earlier versions. While importing, at least 1 sheet must be of Rates type. For this type, the following columns are mandatory:
- Dst Code/Code Name - indicate at least one of them
- Rate
- Effective Date - if you don't indicate this column, the Effective Date, specified in the Code Rules information block, will be applied to imported rates.
- Src Codes type - this type allows a user to perform the import to the code deck attached to the rate table. For this, indicate source codes/code names in the two columns: Src Code and Src Code Name. If selected, both columns must be specified.
- Codes type - this type allows a user to perform the import to the code deck attached to the rate table. For this, indicate destination codes/code names in the two columns: Code and Code Name. If selected, both columns must be specified.
Starting from JeraSoft Billing v3.18.0, the user has an option to select the Skip this sheet option for the system to ignore the respective sheet during import. More about sheet types configuration here.
Screenshot: Sheet types
On the second step, you can also save the importing rate table as a template for further usage during import. To do so, specify a template title in the bottom left corner of the tab, and click the Save Template button (see screenshot above).
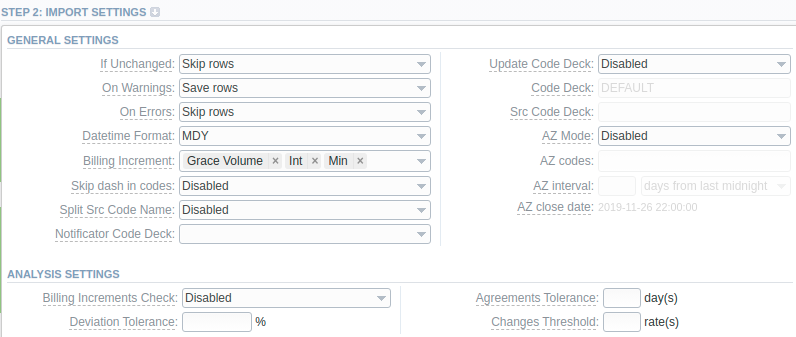
To open advanced configurations, click on a grey downwards arrow icon next to Step 2: Import Settings. Advanced settings contain the following fields:
Screenshot: Advanced settings
...
Determines system behavior if it detects rates in the imported file with all the same settings as the ones already present in the Rate Table but Effective Date. Has two options:
- Save rows
- Skip rows
...
Manages alerts from the Analysis Settings section. If any, you'll have the option to:
- Save rows
- Skip rows
- Abort import
...
Determines billing behavior if inconsistency or error was found in the importing file (data inconsistency, incorrect symbols, etc.)
- Import correct rows and show all found errors - import error-free rows and display the list of errors, if any
- If errors are found, abort import and show all errors - if any error is found, stop the import and display a list of errors
...
Specify the date format of an imported file. Please note, the auto-detection of date and time can be performed with files that contain one of the date and time formats, listed below:
- DD-MM-YYYY (%d-%m-%Y) = 28-12-2018
- YYYY-MM-DD (%Y-%m-%d) = 2018-12-28
- MM/DD/YYYY (%m/%d/%Y) = 12/28/2018
- DD.MM.YYYY (%d.%m.%Y) = 28.12.2018
- YYYY/MM/DD (%Y/%m/%d) = 2018/12/28
- YYYYMMDD (%Y%m%d) = 20181228
- YYYY-MM (%Y-%m) = 2018-12
...
- Min Volume/Interval
- Interval/Min Volume
- Min Volume/Interval/Grace Volume
- Interval/Min Volume/Grace Volume
...
Select whether a dash in codes must be skipped or not:
...
This option is used only in case source code names contain an underscore symbol. Choose one of the following:
- Disabled - if an Src Code Name is, for instance, USA_Columbia, it will be preserved as it is after import.
- By underscore - if selected, a USA_Columbia Code Name will be changed to Columbia after import.
...
Select the way you want both Src and Dst code decks to be updated with new/existing code names from current rates file:
- Disabled - leave selected code decks unchanged
- Import only not existing codes - code decks will be updated with codes and their names if they are missing
- Import all codes (update existing) - сode decks and codes will be updated with code names taken from a file, overwriting of existing ones
- Import all codes (purge code deck first) - code decks are fully cleared and then all codes and code names are imported from a file
| Panel | ||||||
|---|---|---|---|---|---|---|
| ||||||
If Src Code and/or Dst Code sheet type is selected, you need to enable this feature |
...
A special mode that determines system behavior regarding active/future rates:
...
Available if AZ Mode is active. Specify the period for AZ mode to close rates. The selectable options are:
- days from last midnight - the rates will be closed after the specified amount of days from the midnight of the import day
- days from now - the rates will be closed after the specified amount of days from the import day
- hours from XX:00 - the rates will be closed after the specified amount of hours from the start of an hour of the import timestamp
- hours from now - the rates will be closed after the specified amount of hours from the import timestamp
| Panel | ||||||||
|---|---|---|---|---|---|---|---|---|
| ||||||||
| Tip For a detailed explanation, check out our Knowledge Base article |
...
Select whether you need billing increments checking during import or not:
- Enabled - the system will raise an error in case imported rates' billing increments differ from those already present in the Rate Table.
- Disabled
...
| Panel | ||||||
|---|---|---|---|---|---|---|
| ||||||
If you have rates with missing Rate value in the importing file, the system will find the previous rate for the same destination and take this value from there (if the previous rate was not closed). When you have rates with missing Effective Date value, the system will take it from the End Date value. |
Code Rules Information Block
For adding a new code rule, click on the plus icon next to the information block name.
When you add a rule and set the value in the fields, it will overwrite the parameters specified in the respective columns of the file. If you leave fields empty, it will take the parameters from the file.
There is one default rule with * code that affects all the imported codes. The not specified columns of the imported rates will be filled in with the respective field values of this code rule. The list of code rules fields is as follows:
Screenshot: Rates import - Code Rules settings
...
Indicate a status for the rates. By default, it will be Active. Set the Stashed status if you want to double-check them later after import.
...
Specify a start date of a rate. There are various options to schedule this date:
- days from last midnight - the rates will be active after the specified amount of days from the midnight of the import day
- days from now - the rates will be active after the specified amount of days from the import day
- hours from XX:00 - the rates will be active after the specified amount of hours from the start of an hour of the import timestamp
- hours from now - the rates will be active after the specified amount of hours from the import timestamp
...
Additional parameters are stored under the downwards arrow icon.
...
After specifying all additional parameters, click the Import button.
Step 3. Import Errors
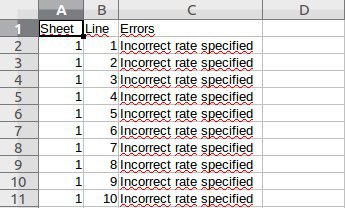
Provided a non-critical error(s) occurred, you will see a table, where the exact sheet, line and error description are specified (see screenshot). In this case, you need to start the whole import procedure from the beginning.
Screenshot: Step 3. Import Errors
In case numerous errors occurred while importing rates, you will be displayed the respective notification:
Screenshot: Error notification
By clicking on Download file, a .csv file with the following columns will be downloaded:
...
...
...
...
Screenshot: .csv file with detailed error data
Confirming Rates
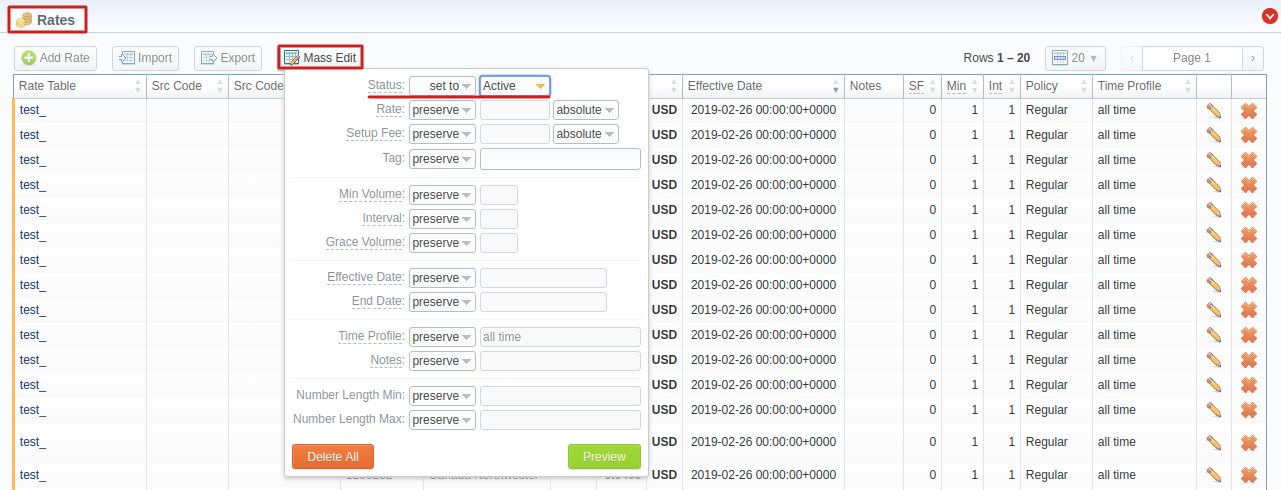
When the procedure has been executed, you will be forwarded to the Rates section where all imported rates will be displayed. If the Auto-Confirm option was disabled during the import process, you need to Mass Edit the rates' status from stashed to active.
Screenshot: Confirming Rates
Import History Tab
The tab contains information about all executed imports to this rate table. You can access it in the Rate Tables → {Specific Rate Table} → Import History. It is presented in the form of a table with the following columns:
Screenshot: Import History output
...
...
...
...
Import file. By clicking on the icon, the file will be downloaded
...
File that contains a description of all errors that occurred during import. By clicking on the icon, the file will be downloaded
...
icon
...
The imported rates are divided into the following types: Unchanged, Increased, Decreased, New. By clicking on the respective numbers of rates, you can see filtered rates by type (see screenshot above) in the Rates section.
| Panel | ||||||
|---|---|---|---|---|---|---|
| ||||||
Imported rates will be marked as Unchanged, Increased, or Decreased only if their Effective Date value (e.g., 04.25.2018) is higher than Effective Date of a current rate (e.g., 04.10.2018) and they don't have an End Date value. If the End Date value is present in a previous rate, the fresh one will be marked as New. |


