Docs for all releases
Page History
...
The tab is designed to provide a user with a possibility to import rate rates to VCS by uploading uploading a .csv or .xls file. The whole process can be divided in into the following steps:
Screenshot: Import tab

Step 1. Selecting a File and Specifying Additional Parameters
First, you need to select a file for import. Additionally, you can specify the following parameters:
Screenshot: Step 1. File Settings

| Field | Description | |
|---|---|---|
| Import templateTemplate | Select a target template for rates importing | |
| Delimiter | Specify here a delimiter symbol here. Possible options are:
By default, the autodetect option is chosenselected. | |
| Auto Confirm | Select whether the system must confirm imported rates automatically or not | |
...
| Panel | ||||||||
|---|---|---|---|---|---|---|---|---|
| ||||||||
|
Step 2. Import Settings
The system will recognize the file and display first 5 rows of the first sheet. To switch from one sheet with rates to another, click on a respective tab: Sheet 1, Sheet 2, etc.
Starting from VCS 3.17.0, the user has a possibility to specify a type for each sheet of an imported file. Each sheet type has its own list of columncolumns.Currently, there are 3 sheet types:
- Rates type - an equivalent to a an importing page from earlier versionversions. While importing, at least 1 sheet must be of Rates type. For this type, the following columns are mandatory:
- Dst Code/Code Name - indicate at least one of them
- Rate
- Effective Date - if you don't indicate this column, the Effective Date, specified in the Code Rules information block, will be applied to imported rates.
- Src Codes type - this type allows user to indicate source codes/code names and has two columns: Src Code and Src Code Name. If selected, both columns must be specified.
- Dst Codes type - this type allows user to indicate destination codes/code names and has two columns: Dst Code and Dst Code Name. If selected, both columns must be specified.
...
On the second step, you can also save the importing rate table as a template for further usage in importing processduring import. To do so, specify a template title in the bottom left corner of the tab, specify a template title and press and click the Save Template button.
To open advanced configurations, click on a grey downwards arrow ![]() icon next to the Step 2: Import Settings. Advanced settings contain the following fields:
icon next to the Step 2: Import Settings. Advanced settings contain the following fields:
Screenshot: Step 2. Import Settings
...
| Field | Description | ||||||||||||
|---|---|---|---|---|---|---|---|---|---|---|---|---|---|
| On Duplicates | Determines billing behavior if it finds duplicate a rate row duplicate. Duplicates are checked by Code + Effective Date pair of columns.
| ||||||||||||
| On Errors | Determines billing behavior if an inconsistency or error was found in the importing file (data inconsistency, incorrect symbols, etc.)
| ||||||||||||
| Date Format | Specify the date format of an imported file. Please note, the auto-detection of date and time can be performed with files that contain one of the date and time formats, listed below:
| ||||||||||||
| Custom formatFormat | If defined, this format will be used for date parsing instead of the Date Format field | ||||||||||||
| Optimize Codes | This option allows to make shorter codes of importing code range. For example, the code range 4400-4409 will be shortened to 440. Please note, a single code 44001 will not be shortened to 440, it only works for code ranges specified with a dash "-".
| ||||||||||||
| Billing Increment | Billing Incement Increment defines the way events are billed and combines two parameters: minimum volume and tariffication interval or three parameters: minimum volume,tariffication interval and grace volume. Indicate the order of parameters recognition in the Billing Increment column:
For example, if the Billing Increment column in your import file is 1, 5, and you selected Min Volume/Intervalvalue in this field, system will recognize 1 as Minimum Volume and 5 as a Tarrification Tariffication Interval for a target rate. | ||||||||||||
| Remove Dash | Select whether a dash in codes must be skipped or not:
| ||||||||||||
| Split Src Code Name | This option is used only in case source code names contain an underscore symbol. Choose one of the following:
| ||||||||||||
| Update Code Deck | Select the way you want both Src and Dst code decks to be updated with new/existing code names from current rates file:
| ||||||||||||
| Dst Code Deck | Dst Code Deck that will be used for an Update Code Deck option. Select a destination code deck that you want to update with the above-mentioned settings (note that code deck specified settings here will only be available if you are importing a file, which contains Code Names in addition to Codes). | ||||||||||||
| Src Code Deck | Src Code Deck that will be used for an Update Code Deck option. Select a source code deck that you want to update with the above-mentioned settings (note that code deck specified settings here will only be available if you are importing a file, which contains Code Names in addition to Codes). | ||||||||||||
| Notificator Code Deck | Specify code decks that will be used for the next rates notification | ||||||||||||
| AZ A-Z Mode | A special mode that determines system behavior regarding active/future rates:
| ||||||||||||
| AZ A-Z codes | Available if AZ A-Z Mode is active. Specify the exact code(s) , AZ A-Z Mode is going to be applied to. By default, the field value is "*" (all codes) | ||||||||||||
| AZ A-Z interval (days) | Available if AZ A-Z Mode is active. It consists of two fields, where time and date of rates closure are specified:
| ||||||||||||
| AZ A-Z close date | Available if AZ A-Z Mode is active. Field The field displays the time and date of rates closure based on the AZ A-Z interval (day) parameters. | ||||||||||||
Code Rules Information Block
For adding a new code rule, click on the plus ![]() icon next to the information block name.
icon next to the information block name.
When you add a rule and set the value in the fields, it will overwrite parameters specified in the respective columns of the file. If you leave fields empty, it will take the parameters from the file.
If you a add a rule with * code for a certain service, not specified columns of the imported rates will be filled in with the respective field values of this code rule. You can add rules with a * code for all services. The list of code rules fields is as follows:
Screenshot: Rates import - Code Rules settings

| Field | Description | |
|---|---|---|
| Code | Indiacte Indicate a destination code. For all codes, use * (asterisk) | |
| Service | Select a service for rate | |
| Effective Date | Specify a start date of a rate | |
| Profile | Indicate time profile that will be used for a current rate, for example, business time, non-business time, weekends, etc. | |
| Min | Minimal time of call that will be tariffed. For example, if total call time was 20 seconds and Min is is 30, then the client will pay for 30 seconds of call. | |
| Int | Tariffication interval. This parameter is used, when Min Time time expires. | |
| Extras | Additional parameters are stored under downwards under the downwards arrow
| |
After specifying all additional parameters, pressclick the Import button.
Step 3. Import Errors
Provided a non-critical error(s) occuredoccurred, you will be displayed see a table, where exact sheet, line and error description are specified (see screenshot). In this case, you need to start the whole import procedure from the beginning.
...
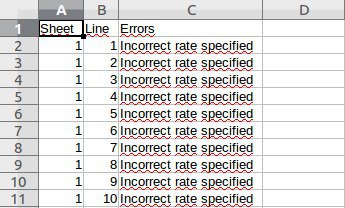
By clicking on Download file, a .csv file with the following columns is will be downloaded:
| Column | Description | |
|---|---|---|
Sheet | Index number of the sheet, where an error occurred | |
Line | Line of the sheet, where an error occurred | |
Errors | Description of the error that occurred | |
Screenshot: .csv file with detailed error data
...
Confirming Rates
When the procedure has been executed, you will be forwarded to the Rates tab where all imported rates will be displayed. They are divided into the following types: Unchanged, Increased, Decreased, New. By clicking on the respective buttons in the top right corner of the tab, you can filter rates by the type (see screenshot).
| Panel | ||||||
|---|---|---|---|---|---|---|
| ||||||
Imported rates will be marked as Unchanged, Increased, or Decreased only if their Effactive Effective Date value (e.g., 04.25.2018) is higher than Effective Date of a current rate (e.g., 04.10.2018) |
If Auto-Confirm option is disabled, you need to press click the Confirm Filtered Rates button (see screenshot) to change rates status from stashed to active.
...
| Column | Description | |
|---|---|---|
Date | Time and date of import execution | |
User Login | Login of a user who executed import | |
File | Import file. By clicking on the | |
| Total | Total amount of imported rates | |
| New | Total amount of rates with New type | |
| Increased | Total amount of rates with Increased type | |
| Decreased | Total amount of rates with Decreased type | |
| Unchanged | Total amount of rates with Unchanged type | |
| A-Z Closed | Number of rates, closed by A-Z import | |
| A-Z Stashed | Number of rates, stashed by A-Z import | |
| Status | Status of imopt import procedure (done/failed) | |
| Error File | File that contains description of all errors , occured occurred during import. By clicking on the | |
| When clicked on, deletes respective import data from the system | |
...
Overview
Content Tools